Lesson Goal: To internalize some authentic comping and soloing vocabulary for “Take the A Train”… by ear, intellect, eye, and muscle…
Table of Contents
Prerequisites
Basic music reading skills… basic scale, chord, and chord progression theory… basic technique… the LOVE of music… and the discipline to study and practice.
back to… Table of Contents
Study, Practice, & Performance Tips
- All of this might sound like a lot of work, but it’s not nearly as much as you think. Because even though it takes time to talk about all these things, in practice they can all be done simultaneously!
- Your goal is not to merely memorize this, but to study and practice it until you internalize it using all four musical intelligences: ears, intellect, eyes, and muscles.
- Every time you practice something, you are programming your brain. So always play accurately.
- Practice with a Click Track or a Rhythm Track. Doing so will give you immediate feedback on any rhythmic misconceptions or places where your timing gets sloppy.
- Record Yourself. Always. Listen to the playback immediately. And ask yourself: Is that what you intended to play?”
- If anything feels tense or awkward, stop immediately and experiment with alternative fingerings or choreography.
- Play this in other keys you expect to play in. By the way, once you see the patterns (which is guaranteed if you know your scales and chords) finding the notes in other keys will be a piece of cake!
- If you feel stuck or overwhelmed, realize that anything can and will be mastered if you slow things down or break things down to small enough pieces.
back to… Table of Content
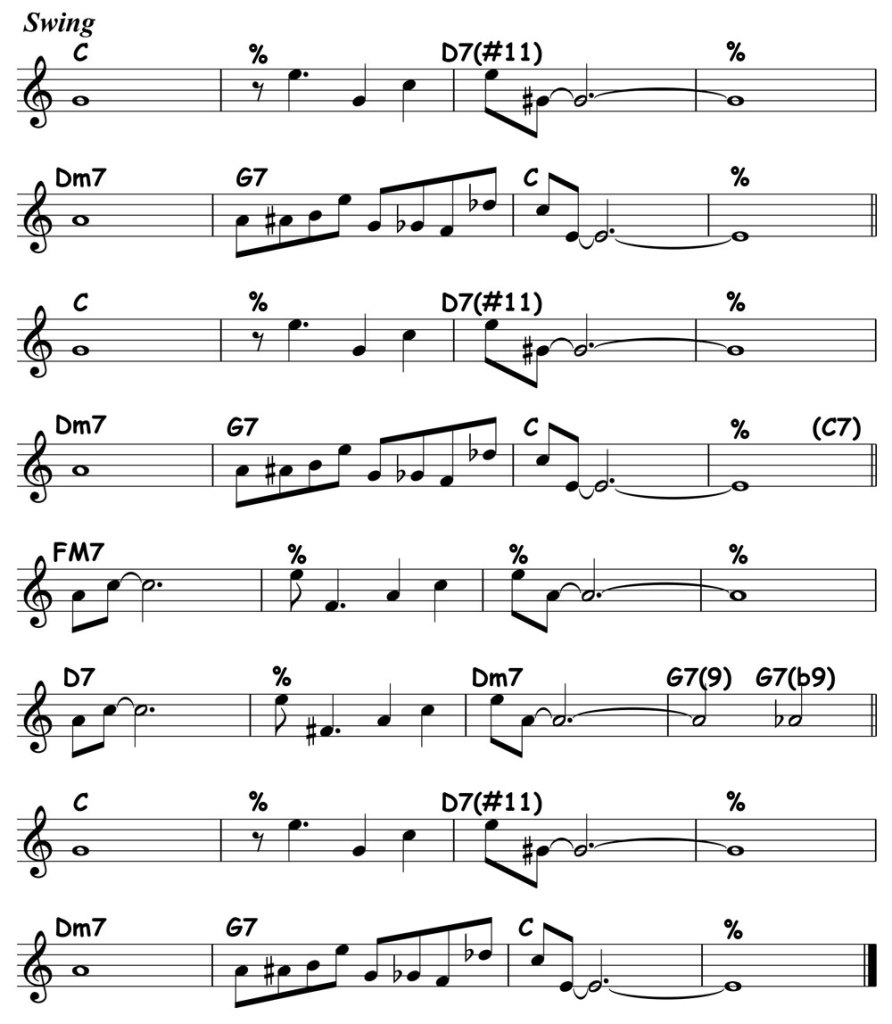
Lead Sheet for “Take the A Train”
Composed by Billy Strayhorn and the signature tune for the Duke Ellington Orchestra, “Take the A Train” is a superb introduction to swing rhythm, 32 bar song form, the major ii-V-I chord progression, the II7 secondary dominant, and more.
back to… Table of Contents
Definitive Performance of “Take the A Train”
A great way to start studying a new tune is to read the score as you listen to a definitive performance. As you do so, you will start to associate the sounds you are hearing and feeling with the notes and chord symbols and will start to internalize the form, harmony, melodic ideas, rhythmic feel, syncopations, and phrasing.
As you read the lead sheet, you may have noticed that some note durations in the Bridge don’t match the score. Don’t fuss over this. Just be aware of it and realize that it’s the nature of jazz for performers to take some liberties with their interpretation.
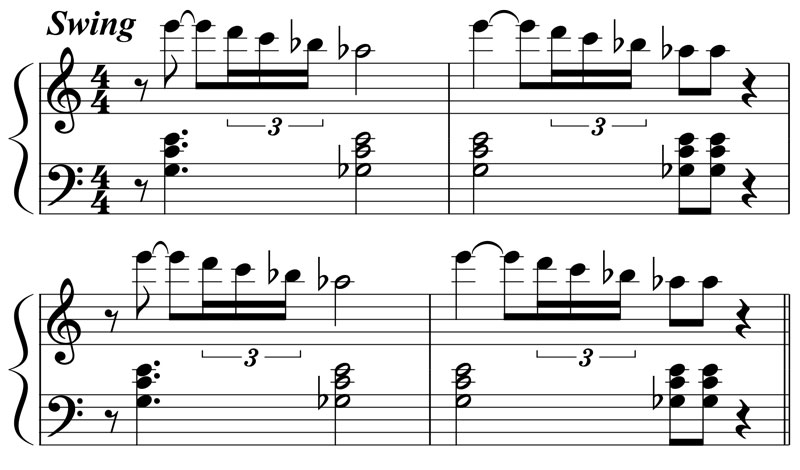
Signature Intro for “Take the A Train”
An illuminating lesson in how to think about and internalize the signature introduction to “Take the A Train”…
You’ll hear a few variations of the basic idea, but here it is in it’s most essential form…
Expert Study Notes
Don’t try to memorize this as a bunch of unrelated notes, but don’t try to overanalyze it either. Your goal is to internalize the sounds, feelings, and functions in order to perform them like an artist, not to get a good grade on a music theory test. So, if some analysis will help us understand this and perform better, let’s do so like musicians, not like computers. To that end (and to Frank’s artistic sensibilities), the design goes something like this:
- The first chord in the left hand is a C chord which defines the tonality as C Major, but…
- It’s an inverted (and therefore unstable) C chord which defines the tonality as C Major, but in an unsettled way.
- In the right hand line, the tonality is further emphasized by putting the note E (Mi) at the beginning, at the very top, and in a conspicuous part of the meter, but…
- The descending line of whole tones immediately creates harmonic tension well “outside” the C major tonality.
- The line lands on Ab/G#, which is the most important “surprise” note in the head (the melody). This plants that note in the listener’s ear as a core element of the entire composition.
- The second chord in the left hand is just a super cool tension chord that doesn’t fall into any pre-existing box. So, don’t try to name it. Just flatten the G, accept it for what it is, and enjoy!
- The last chord is a syncopation, a standard swing device and a way to create and maintain rhythmic tension. in order to convince yourself of this, try not playing the last chord and see how things sound and feel.
- The unstable harmonies, descending whole tone line, mutant tension chord, chromaticism, and syncopation all conspire to create a strong sense of urgency and anticipation that’s the musical equivalent of “All aboard!”
How do YOU think about and internalize this exquisite piece of music?
back to… Table of Contents
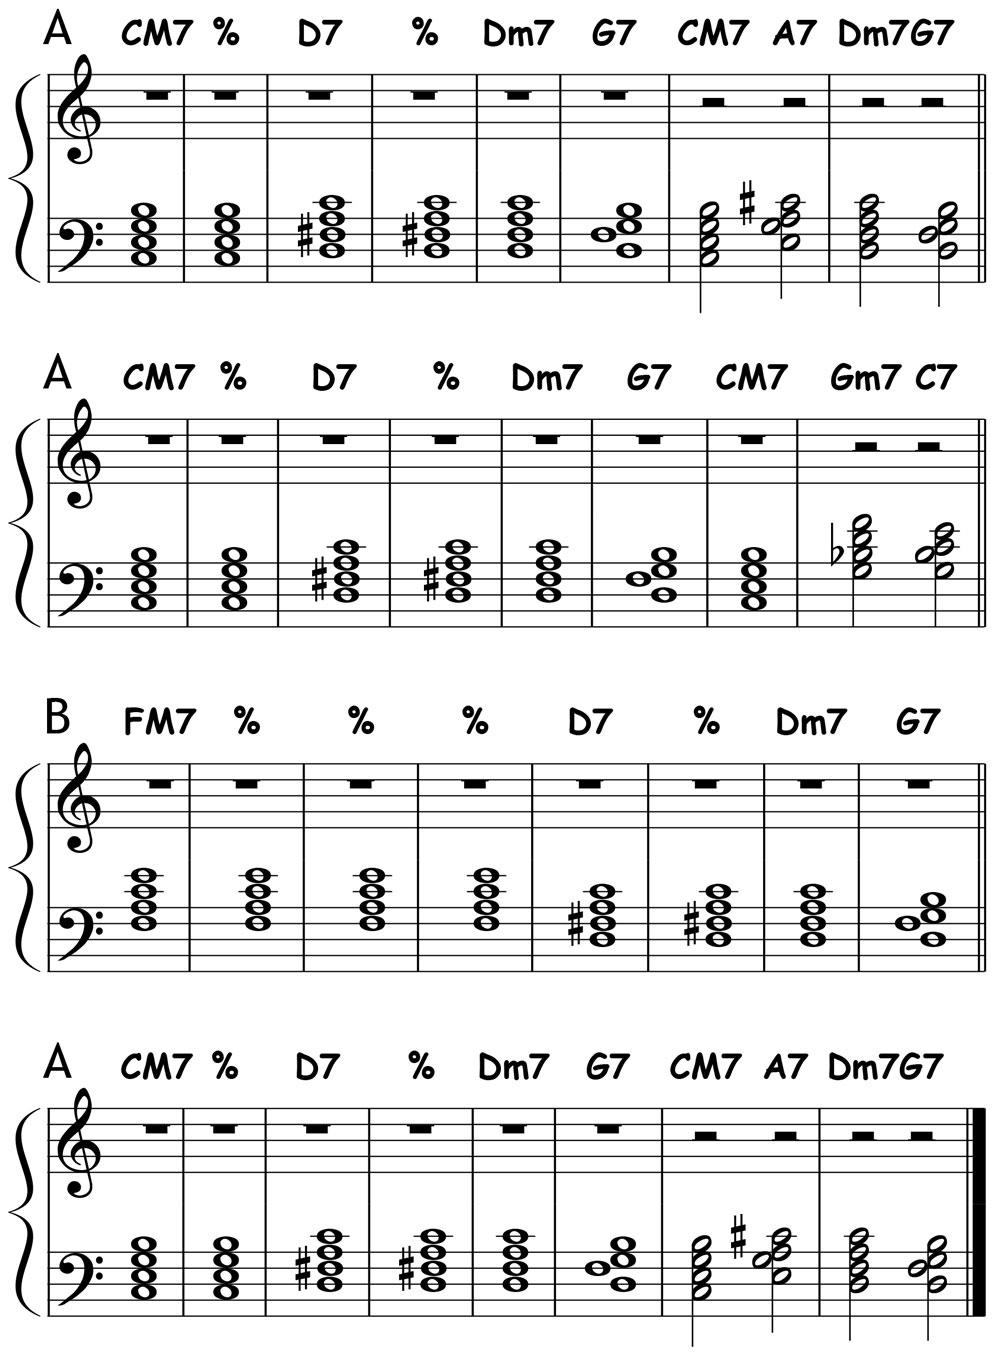
“Take the A Train” Form & Harmony
An in depth study of the form and harmony of “Take the A Train”– essential preparation for comping and soloing in 32 bar song form…
Overall Structure
“Take the A Train” is a classic 32 bar AABA song form, where each section (A, B) is 8 bars long.
Here’s a simplified version to begin our studies of the form and harmony… with chord roots in the left hand and block chords in the right hand.
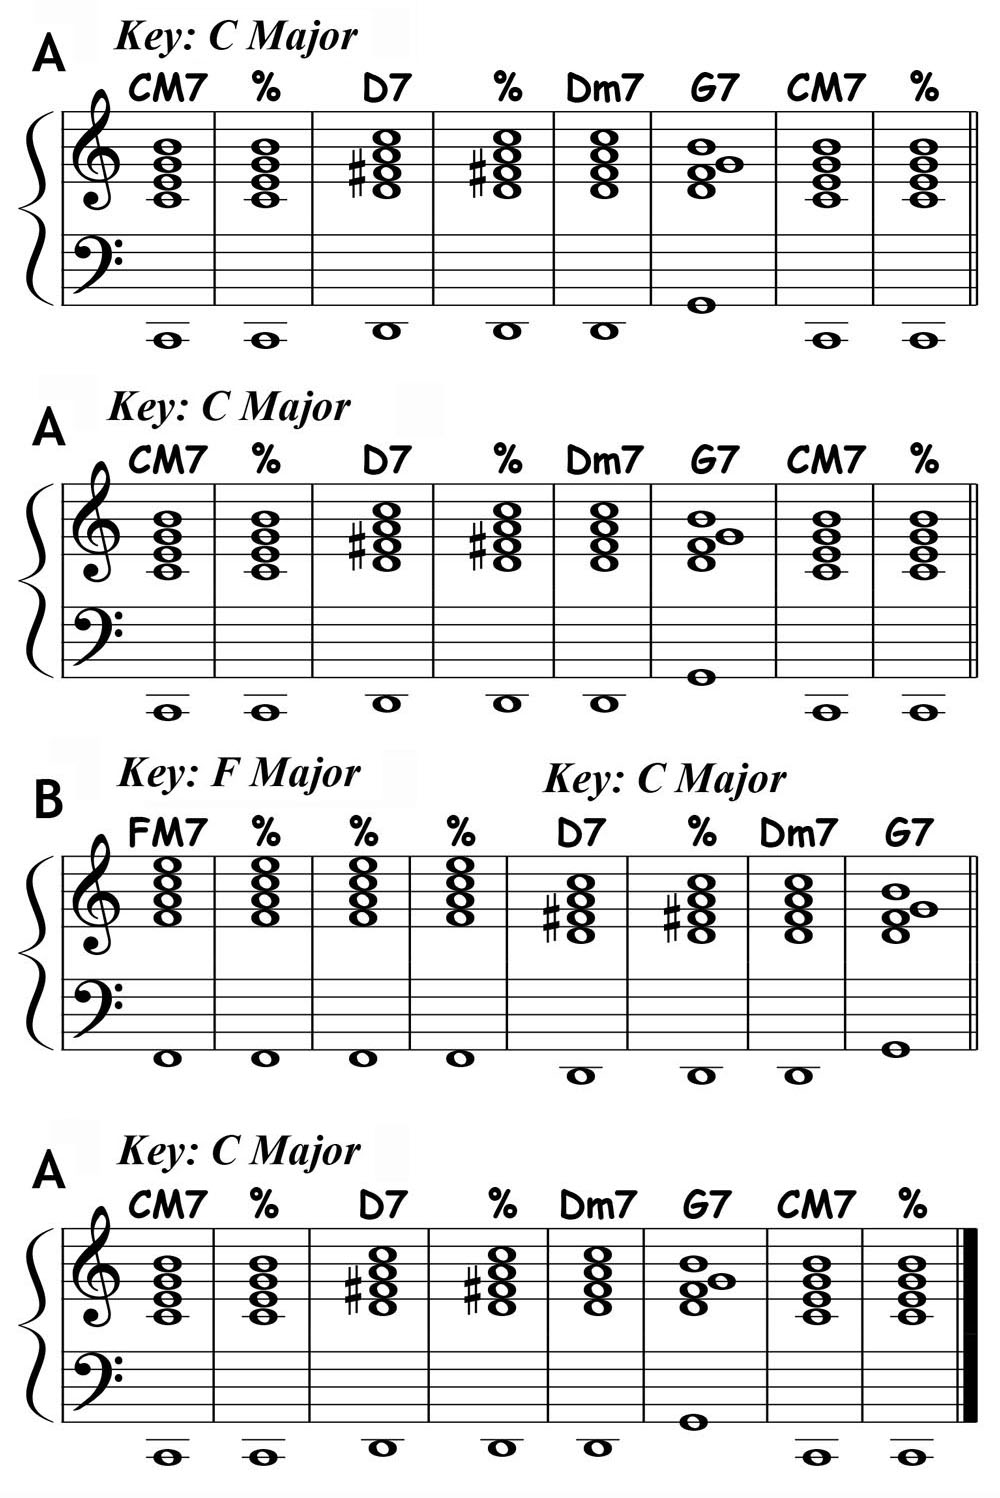
Read the score as you play and be receptive to the sound, feeling, and function of each chord with special attention to where each chord is located within the structure of the piece.
Special Note about the D7 chord…
The D7(#11) in the original score can be played as a simple D7 chord because the note A (the 5) is already a strong overtone in any D chord.
Sidebar: This piece has what might be considered a medium harmonic rhythm, meaning that the chords last at least one, sometimes two full bars.
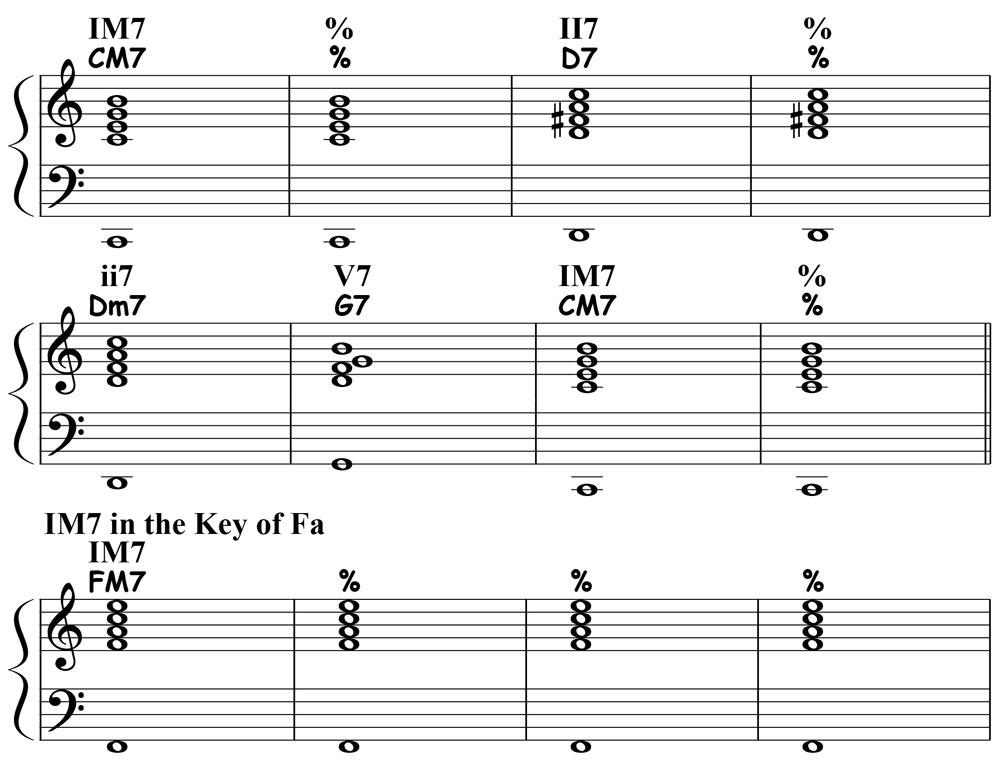
Roman Numeral Analysis
Here’s a functional analysis of the harmony using the Roman Numeral system. One of your goals as you study and practice is to associate the name of these chords using roman numerals with how each one sounds, feels, and functions.
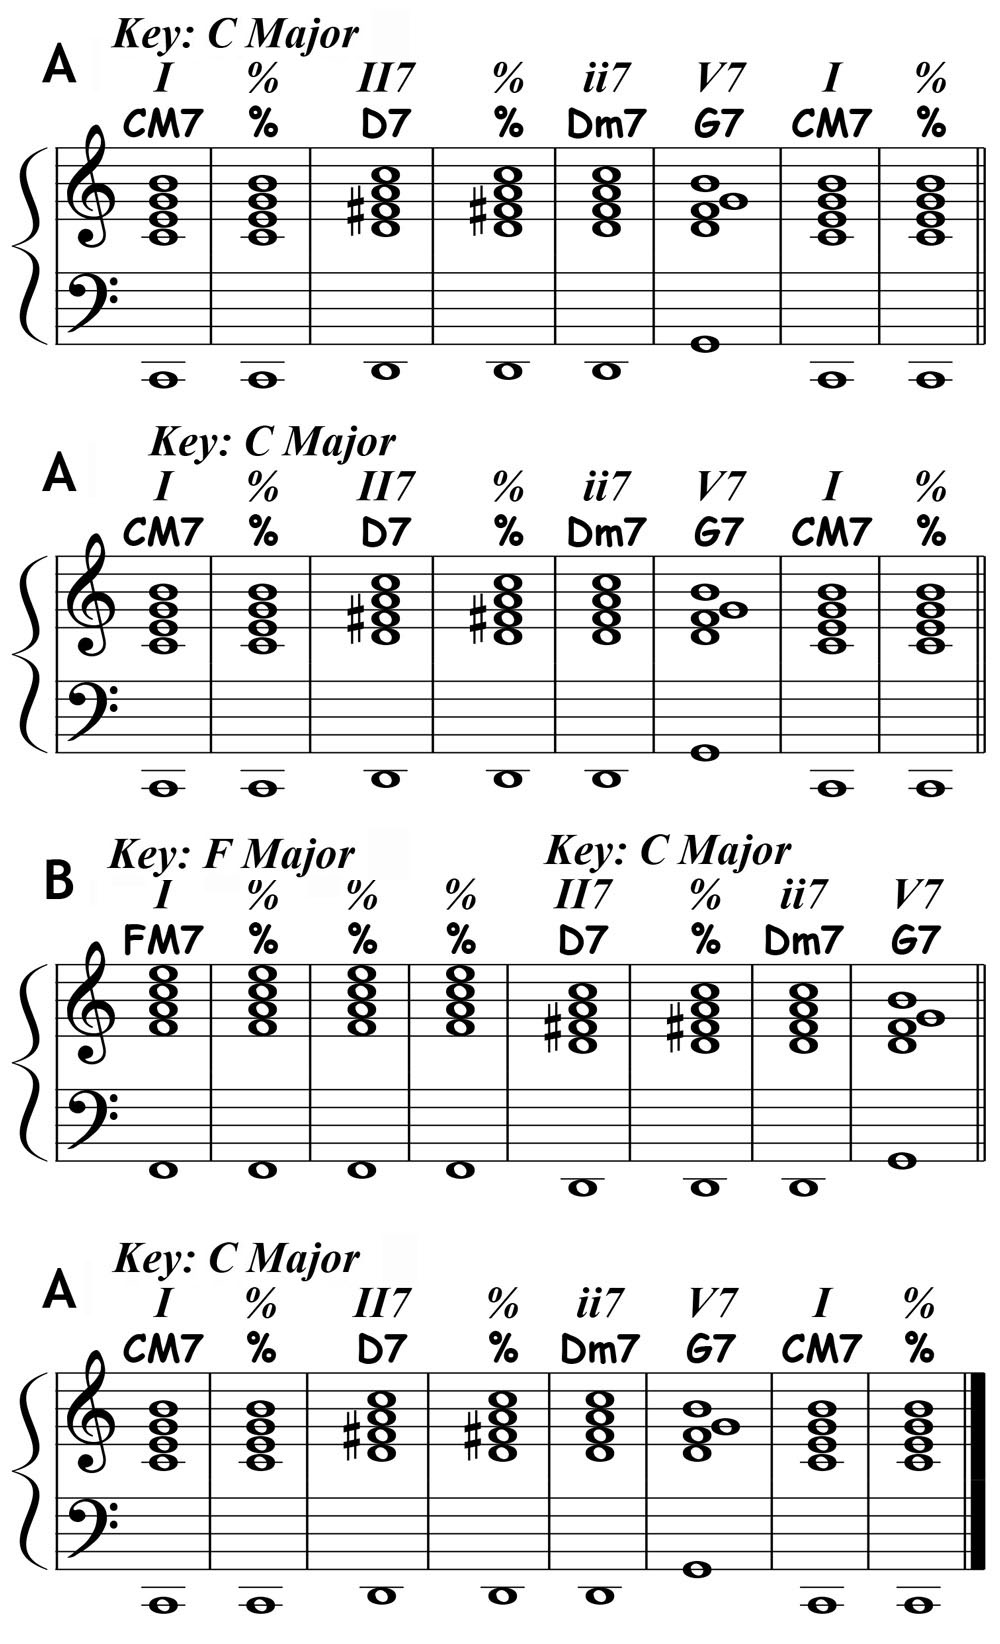
“A” section Form & Harmony
This 8 bar long section can be analyzed in as follows:
- Bars 1&2 establish the home key and tonality (C Major).
- Bars 3&4 create harmonic tension using a secondary dominant II7 (V7/V).
- Bars 5&6 extend the harmonic tension using a ii7-V7 progression.
- Bars 6&7 resolve the harmonic tension with a return to the I chord.
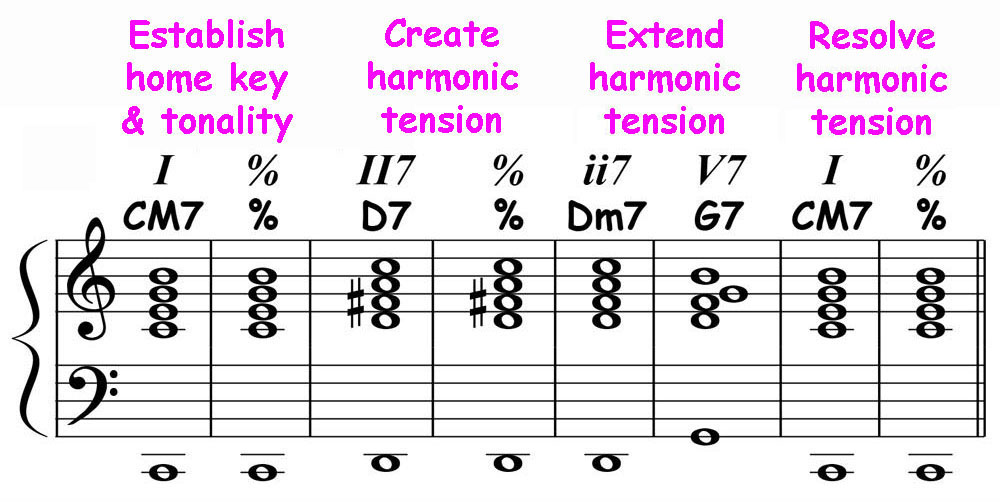
As always, read the score as you play and be receptive to the sound, feeling, and function of each chord with special attention to where each chord is located within the 8 bar structure.
“B” section Form & Harmony
This 8 bar long section can be analyzed in as follows:
- Bars 1&2 moves the key center and tonality to the key of Fa (F Major).
- Bars 3&4 dwell in the new key, giving a full four bars in the key of Fa.
- Bars 5&6 set up a return to the home key using a secondary dominant V7/V.
- Bars 7&8 extend the setup to return to the home key using a ii7-V7 progression.
- (Notice that bars 5-8 are identical to bars 3-6 in the A section.)
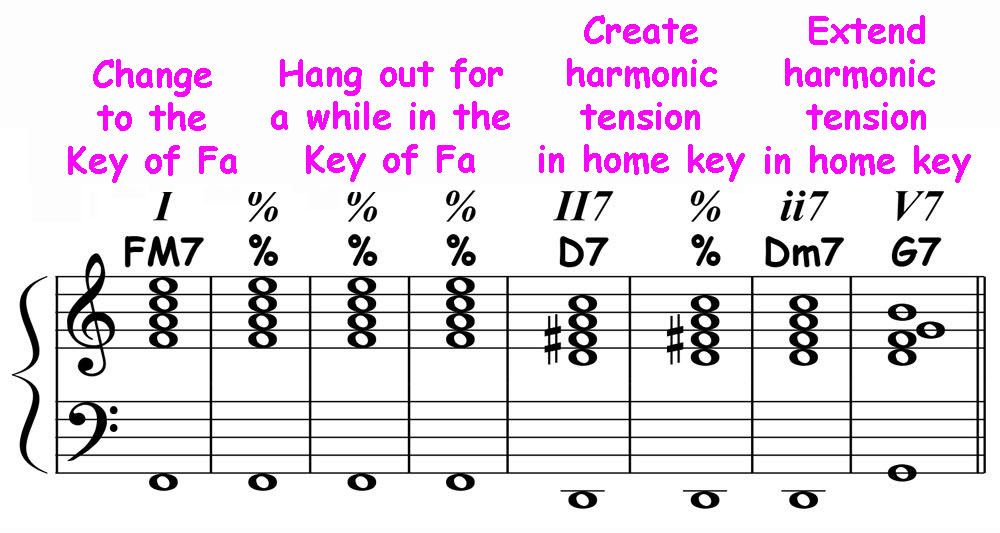
As always, read the score as you play and be receptive to the sound, feeling, and function of each chord with special attention to where each chord is located within the 8 bar structure.
Sidebar: The B section of such tunes is commonly also called the bridge.
back to… Table of Contents
Melodic Ear Training
Melodic analysis and ear training of “Take the A Train” using Solfege…
A strong and musical melody is never just a bunch of unrelated pitches but is a collection of meaningful patterns. And so, one of your goals is to internalize these patterns by ear, intellect, eyes, and muscles. One way to accomplish this is to use Solfege in order to understand how each pitch sounds and feels relative to the key center (Do).
Why Solfege Ear Training is So Important…
The ability to understand melodies in functional melodic / harmonic terms will pay enormous dividends in your ability to read, “memorize” new pieces, improvise, transpose, and play by ear.
This lesson is designed to help you deeply internalize the sound, feeling., and function of each note.
The benefits include the abilities to…
(1) Retain a sense of the key center Do while the melody notes are changing.
(2) Hear and feel the unique sound-feeling of each melody note with respect to the key center Do.
(3) Gear and feel a change of key center to a different pitch.
(4) Hear and feel changes of tonality (major, minor, etc).
Important Notes on How to do Solfege Ear Training
First, you must establish a clear sense of the center C (Do) by playing the Note C or CM7 chord on the piano and humming or singing the solfege syllable DO out loud. Sustain or repeat C long enough to establish it as the key center in your mind’s ear. If it helps, sing it out loud as follows: “C, Do, C in the key of C is Do.” as you play the note on the piano.
Sing each melody note out loud and in the same sequence each appears in the melody. Don’t worry about the rhythm at first. Focus on the unique sound-feeling of each Solfege syllable with respect to the key center DO. Once you’ve master each note independently of the rhythm, go back a put it all together with the rhythm.
Extremely Important: This is not a race or a mindless sing along. Take as long you need to find and sing each note out loud using Solfege and sustain or repeat it long enough for the sound-feeling of each note to make an impression on your mind’s ear. You’ll know this happens because you’ll hear and feel something “click” in you mind’s ear! How slow? As long as it takes until you feel something click!
Your ultimate goal is to hear each note in your mind’s ear before you sing it, but it’s ok to “cheat” to get there. When you have trouble hearing a note or the key center, do not give up! Fight for each and every note using what you know. When you lose your sense of the key center, take the time to reestablish Do by playing and singing it. And if you cannot hear and feel the note in question, try singing up or down the major scale to find it.
If you do, your musical ears will absolutely be rewarded for your discipline.
Listen to Frank model how you might do Solfege ear training for “Take the A Train”…
Solfege Analysis of “Take the A Train”
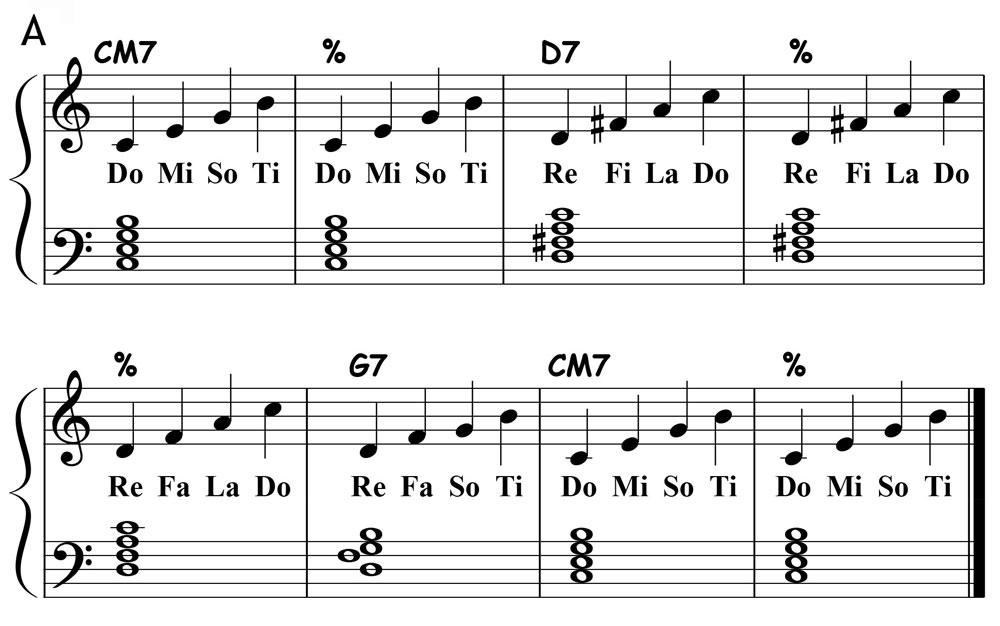
A section
Don’t just passively read or play this. Study it deeply and play and sing it out loud using the guidance above on how to do Solfege ear training…

Don’t merely trust Frank’s analysis here. Play along using the simple block chord arrangement shown, sing the melody out loud and confirm this by ear…
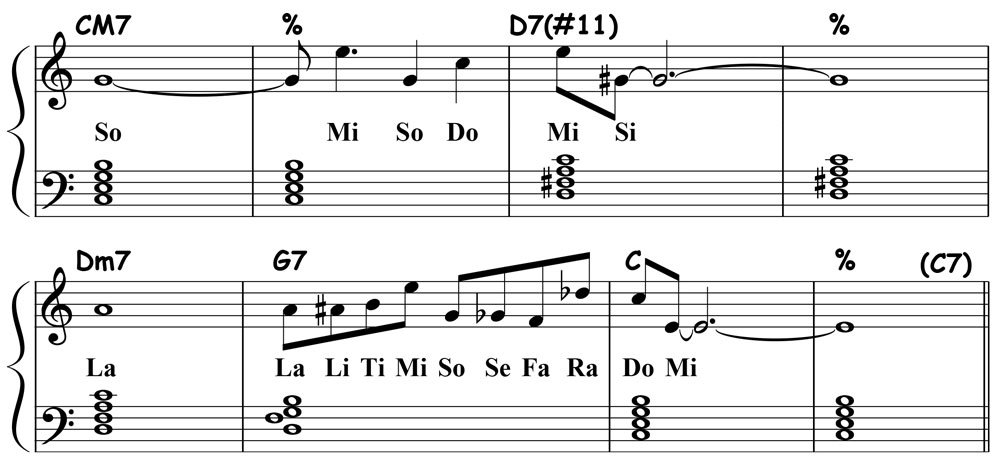
Special Note about the CM7 chord…
CM7 could also be a C6, C7,9, C6/9, or CM7,9,13. Because the primary chord tones are C-E-G (Do-Mi-So). All other notes (6, 9,13) are color tones.
Special Note about the D7(#11) chord…
The D7(#11) can be played as a simple D7 chord because the note A (the 5) is already a strong overtone in any D chord.
It’s perfectly ok to think of and play this as a D7,b5 instead.
B Section (Bridge)
As always, don’t just passively read or play this. Study it deeply and play and sing it out loud using the guidance above on how to do Solfege ear training…
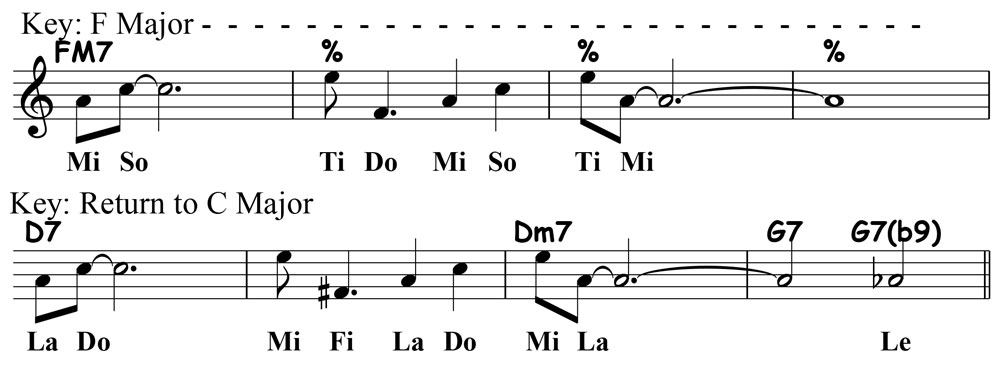
Don’t merely trust Frank’s analysis here. Play along using the simple block chord arrangement shown, sing the melody out loud and confirm this by ear with special attention to the momentary key change to the key of Fa…

Special Note about the FM7 chord and tonality…
Some might argue the the FM7 is just the IV chord in the key of C Major, but to Frank’s ears these four bars on the FM7 chord is a bona fide key change to the key of F Major. As always, don’t just trust Frank’s analysis and experience. Trust your own ears. So, if you want to know what key you are in, simply stop anywhere in the music and ask yourself: Which note sounds and feels like Do? THAT is the key you are in!
back to… Table of Contents
“Take the A Train” Modes
A lesson in how to internalize the basic chord / scale combinations for “Take the A Train”… by ear, intellect, eye, and muscle…
Knowledge & Skills: How chords and scales intersect with each other, visuospatial awareness of the keyboard, aural awareness of how each chord and scale combination sounds, feels, and functions in a real world context.
Studying and practicing such chord / scale relationships in this disciplined way will pay huge dividends (by osmosis) in all your music making: reading, ear training, comping, soloing, and transposition. Guaranteed!
CM7 Chord / C Major Scale
The C major 7th chord (I) can be paired with the C major scale as follows…

Notice how the chord tones (1-3-5-7) “intersect” with the scale: chord tones falling on the downbeats and the “in between” notes falling on the upbeats.
D7 Chord / D Mixolydian Scale
The D dominant 7th chord (II7 or V7/V) can be paired with the D Mixolydian Scale as follows…

Notice how the chord tones (1-3-5-b7) “intersect” with the scale: chord tones falling on the downbeats and the “in between” notes falling on the upbeats.
Dm7 Chord / D Dorian Scale
The D minor 7th chord (ii7) can be paired with the D Dorian Scale as follows…
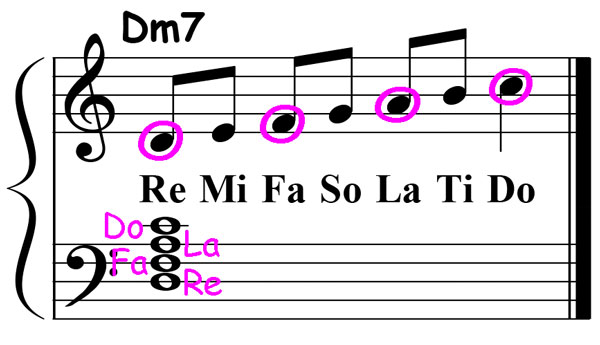
Notice how the chord tones (1-b3-5-b7) “intersect” with the scale: chord tones falling on the downbeats and the “in between” notes falling on the upbeats.
G7 Chord / G Mixolydian Scale
The G dominant 7th chord (V7) can be paired with the G Mixolydian Scale as follows…

Notice how the chord tones (1-3-5-b7) “intersect” with the scale: chord tones falling on the downbeats and the “in between” notes falling on the upbeats.
FM7 Chord / F Major Scale
F is the root of the chord. Notice that the key center has shifted from C to F. F, which was Fa in the key of C, is now Do in the key of F:
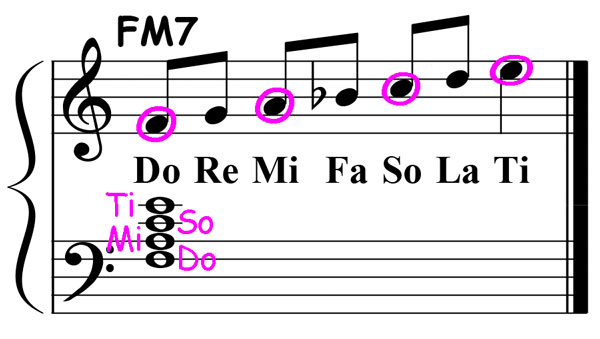
Notice how the chord tones (1-3-5-7) “intersect” with the scale: chord tones falling on the downbeats and the “in between” notes falling on the upbeats.
It’s absolutely essential to understand and hear that this is a bona key change to F major. Don’t just trust Frank here. Experiment with playing the A section then play this, stop, and ask yourself: Which note sounds and feels like the key center Do?
Putting it All Together
Let’s play every chord / scale pairing in the entire 32 bar form using this simple arrangement…


Listen to Frank model one way to practice this at 120 beats per minute (Frank still needs to tighten up some of his rhythm and articulations)…
Expert Practice Tips
- Always play with a rhythm track.
- Always record yourself, listen to the playback immediately, and ask yourself” “Is that what I intended to play?”
- Don’t hesitate to play at a slower tempo if you need to. This is all part of the learning process.
- Feel free to play at a faster tempo, but make sure you play accurately and with good rhythm.
- Play each left hand chord and single right hand note as if you have one giant 10-finger hand (No flams).
- Play with steady 1/8th notes. (Don’t try to swing yet).
- Take the time to really tighten up your rhythm. Do so will pay huge dividends in all your playing.
- Don’t play this mindlessly and mechanically. Play it musically by allowing your mind’s ear to be the leader.
- Hum, sing the Solfege, or scat and see how this affects the way you play and how the music sounds and feels.
- Make sure your humming, singing, or scatting leads (not follows) your playing.
- if you lose the sense of what key you’re in, experiment with stopping in random places and ask yourself: Which note sounds and feels like Do? THAT is the key you in!
back to… Table of Contents
“Take the A Train” Harmonic Ear Training
A set of read, play, & sing studies that will teach you how to think about, hear, see, and feel the chord changes to “Take the A Train”…
Takeaway #1. Chord progressions are typically as much horizontal (melodic) musical patterns as they are vertical (harmonic) musical patterns. In other words, harmony is melody and melody is harmony.
Takeaway #2. Chord progressions can be thought about, heard, seen, and felt as individual voices (like a voice in a choir) that flow melodically through the changes.
Takeaway #3. The sound, feeling, and function of any chord and note always depends on the context. For “Take the A Train” the context is 32 bar song form. And so, one of your ear training goals is to internalize the sound-feeling-function of the chords and notes based on where they are located within the form.
Play & Sing the Chords as Arpeggios…
One way to internalize the chord progressions by ear, intellect, eye, and muscle is to read, play, and sing each chord as an arpeggio…

Listen to Frank model how one might study and practice the above…
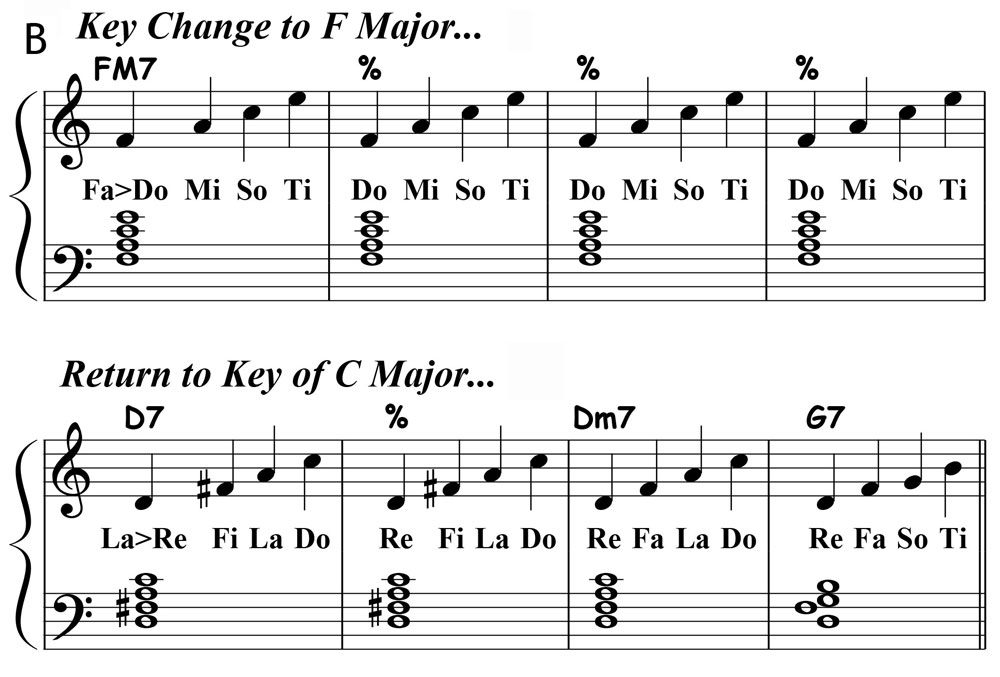
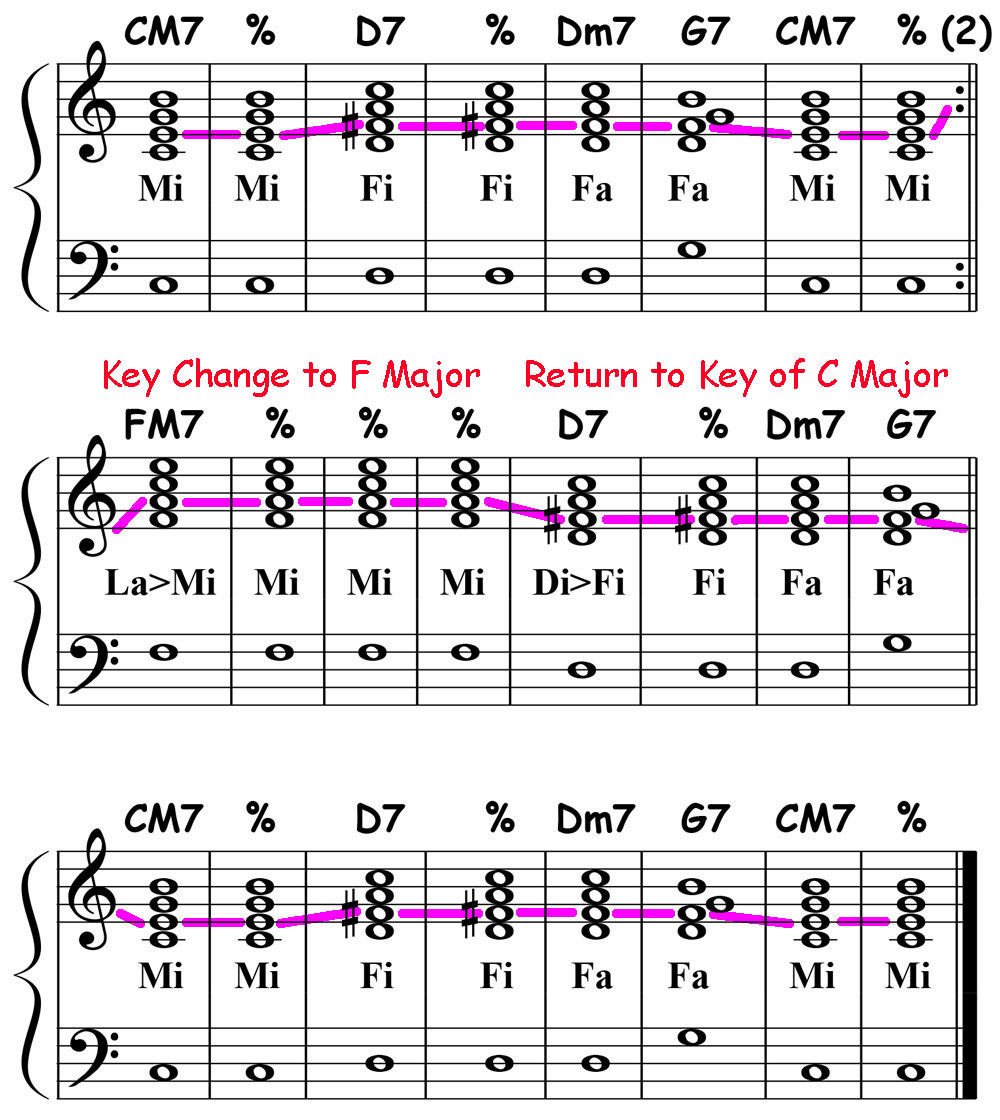
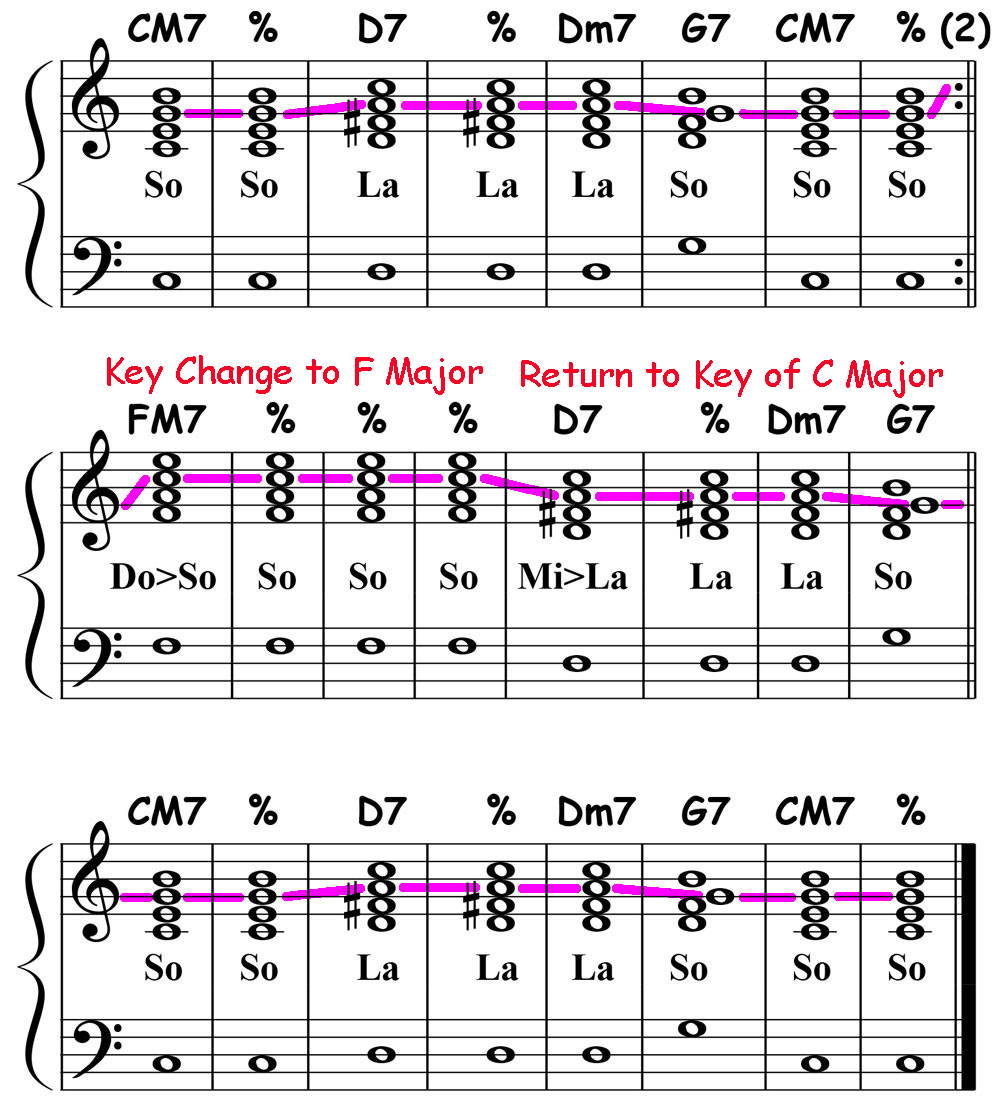
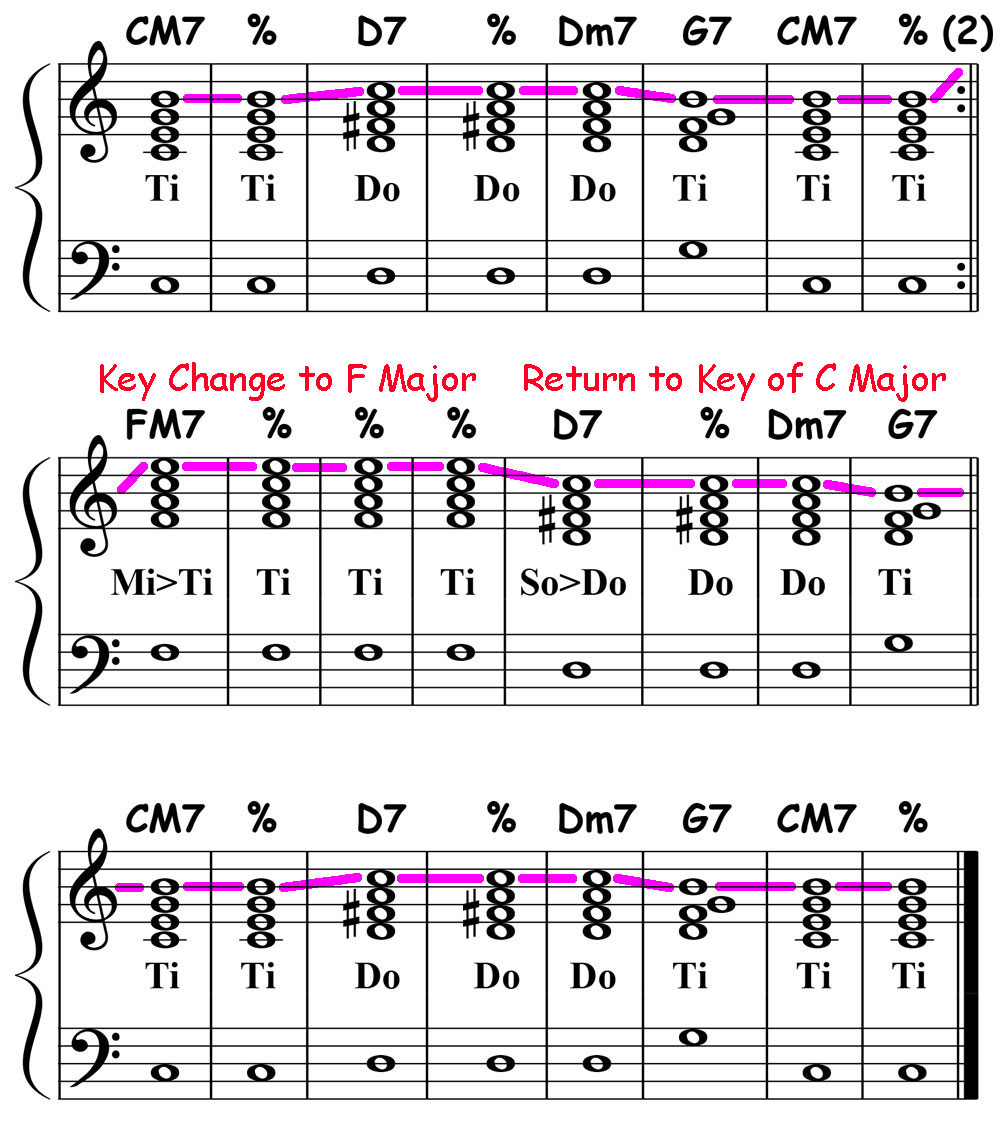
About the B Section (The Bridge). An extremely common practice in 32 bar song form is to change keys in the bridge, which provides some harmonic contrast and interest. In the case of “Take the A Train” the bridge shifts to the key of “Fa Major” for fours bars before returning back to the main key. This requires us to shift our sense of key center and tonality accordingly. To that end, notice how the Solfege syllables shift to suit the change in key center. Of course, this is not just an intellectual shift. You must also shift the sound-feeling-function in your mind’s ear. This is a classic example of having “flexible ears”, a concept Frank learned when he studied Solfege ear training in Dick Grove’s “School without Walls” many years ago.
Never just play and sing these ear training studies mindlessly and mechanically. Work your way through the changes and fight for every note, taking enough time for the sound, feeling, and function of each chord and note to make a meaningful impression on your mind’s ear. If you work in this disciplined way, your ears are guaranteed to blossom!
Play & Sing the Bass Voice…
One way to internalize the chord progressions is to read, play, and sing the Bass voice (just like a voice in a choir) as it moves through the changes…

Right Click to Download Play Along Track (The Score Above) @ 120 bpm
Listen to Frank model how one might play and sing the bass voice at 120 beats per minute…
Ditto Green and Yellow Boxes Above!
Play and Sing the “Do” Voice…
One way to internalize the chord progressions is to read, play, and sing the “Do” voice as it moves through the changes…

Right Click to Download Play Along Track (The Score Above) @ 120 bpm
Listen to Frank model how one might play and sing the Do voice at 120 beats per minute…
[Notice how Frank emphasizes the voice he is trying to internalize (in this case Do) by repeating it and playing it louder than the other voices. Doing so really helps to focus his hearing and tune things up, something he works on every day!]
Ditto Green and Yellow Boxes Above!
Play and Sing the “Mi” Voice…
One way to internalize the chord progressions is to read, play, and sing the “Mi” voice (the voice that defines the tonality as major) as it moves through the changes…
Right Click to Download Play Along Track (The Score Above) @ 120 bpm
Listen to Frank model how one might play and sing the Mi voice at 120 beats per minute…
[Notice how Frank emphasizes the voice he is trying to internalize (in this case Mi) by repeating it and playing it louder than the other voices. Doing so really helps to focus his hearing and tune things up, something he works on every day!]
Ditto Green and Yellow Boxes Above!
Play & Sing the “So” Voice…
One way to internalize the chord progressions is to read, play, and sing the “So” voice as it moves through the changes…
Right Click to Download Play Along Track (The Score Above) @ 120 bpm
Listen to Frank model how one might play and sing the So voice at 120 beats per minute…
[Notice how Frank emphasizes the voice he is trying to internalize (in this case So) by repeating it and playing it louder than the other voices. Doing so really helps to focus his hearing and tune things up, something he works on every day!]
Ditto Green and Yellow Boxes Above!
Play & Sing the “Ti” Voice…
One way to internalize the chord progressions is to read, play, and sing the “Ti” voice as it moves through the changes…
Right Click to Download Play Along Track (The Score Above) @ 120 bpm
Listen to Frank model how one might play and sing the Ti voice at 120 beats per minute…
[Notice how Frank emphasizes the voice he is trying to internalize (in this case Ti) by repeating it and playing it louder than the other voices. Doing so really helps to focus his hearing and tune things up, something he works on every day!]
Ditto Green and Yellow Boxes Above!
back to… Table of Contents
Expanded Harmonies
An exploration of bread and butter ways to expand the basic chord progressions for “Take the A Train”…
There is no rule that requires you to use the chords and chord progressions in the basic chart as is. Here, for your consideration, are three commonly used ways to expand the basic chord progressions using turnarounds, secondary dominants, and neighbor chords. As you read and play, you will start to develop a deep understanding of what makes “Take the A Train” really tick harmonically and take your understanding of form and harmony to the next level.
First Ending: Insert a Turnaround
The first ending (bars 7 and 8 first time through the A section) is a perfect place to insert a 1-6-2-5 turnaround, which adds lots of harmonic interest, keeps the time flowing, and strongly leads the ear back to the top…
Basic Harmony

Expanded Harmony
A 1-6-2-5 turnaround inserted in bars 7 and 8…

You’re always doing ear training, right? In this case you should be telling yourself: THIS is how a [major] IM7-VI7-ii7-V7 turnaround chord progression sounds, feels, and functions!
Second Ending: Insert a Secondary Dominant (ii7-V7/IV) of the New Key
The second ending (bars 7 and 8 second time through the A section) is a perfect place to insert a secondary ii7-V7 of the new key key (F major) in the Bridge. Doing so adds lots of harmonic interest, keep the time flowing going, and strongly leads the ear to the new key…
Basic Harmony
Expanded Harmony
A (ii7-V7)/IV secondary dominant inserted in bar 8…

You’re always doing ear training, right? In this case you should be telling yourself: THIS is how a secondary dominant (ii7-V7)/IV chord progression sounds, feels, and functions!
Bridge: Insert Neighbor Chord Vamp
Four bars spent on a single chord can sound and feel static and monotonous. One way to create some harmonic interest is to alternate the main chord (IM7) with a neighbor chord such as ii7 as follows…
Basic Harmony

Expanded Harmony
Notice how the neighbor chord concept doesn’t fundamentally change the basic FM7 harmony. It just dresses things up a bit…
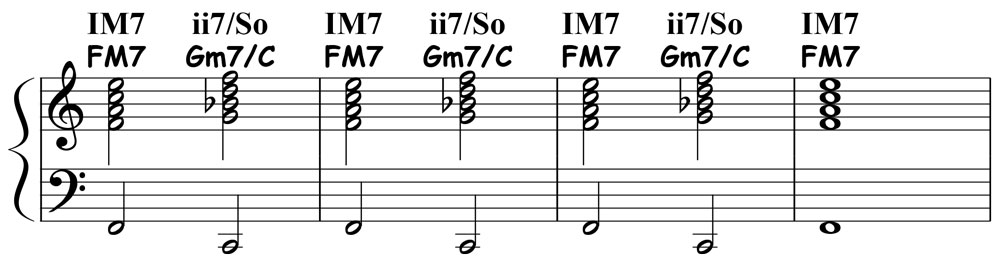
You’re always doing ear training, right? In this case you should be telling yourself: THIS is how a IM7-ii7/So vamp sounds, feels, and functions!
Putting it All Together
Now let’s put together all the expanded harmonies above for an entire chorus…

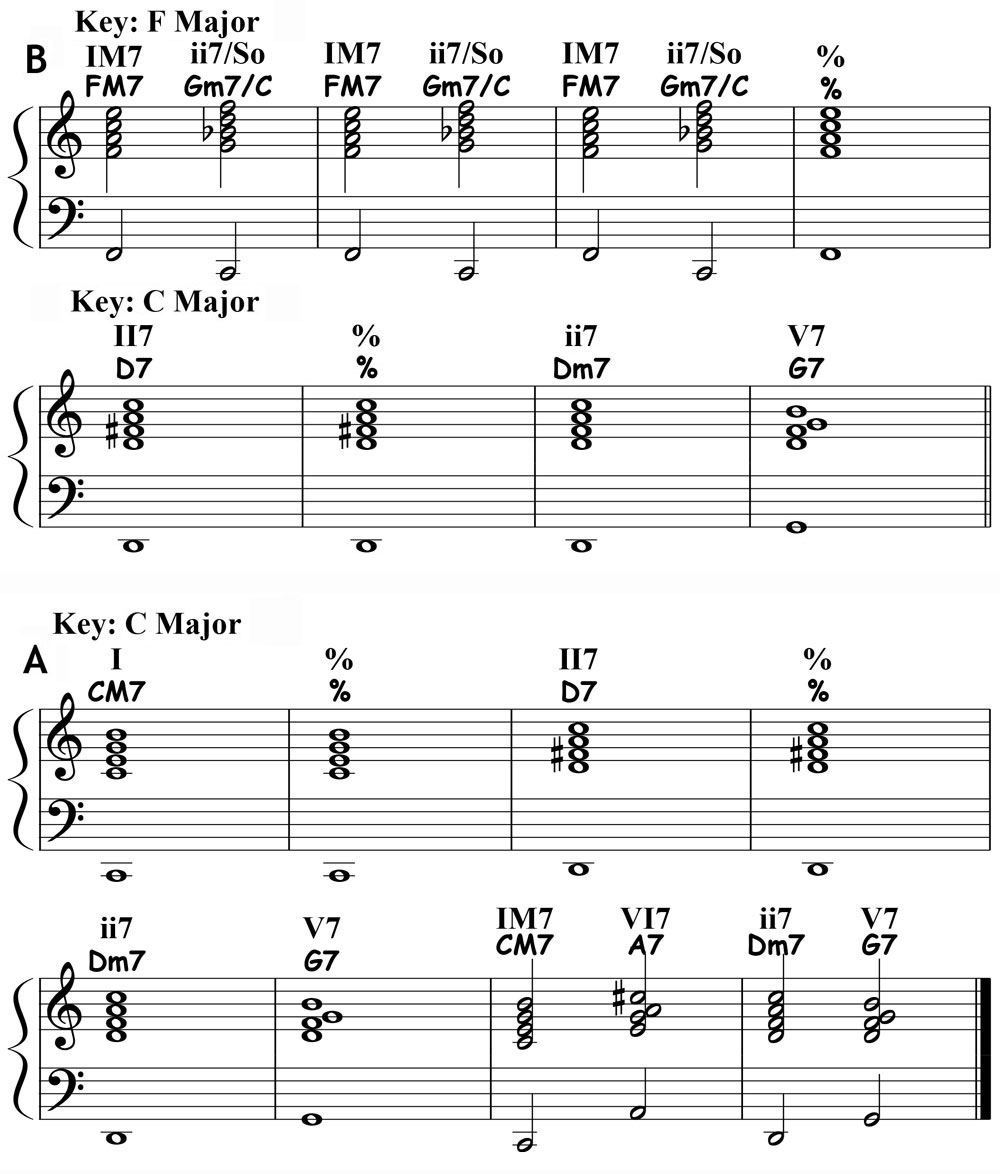
Never just play these mindlessly and mechanically. As you read and play, associate the sounds, feelings, and functions of each chord. As you do, you will quickly acquire the knowledge and skill to play jazz by ear, intellect, eyes, and muscles!
back to… Table of Contents
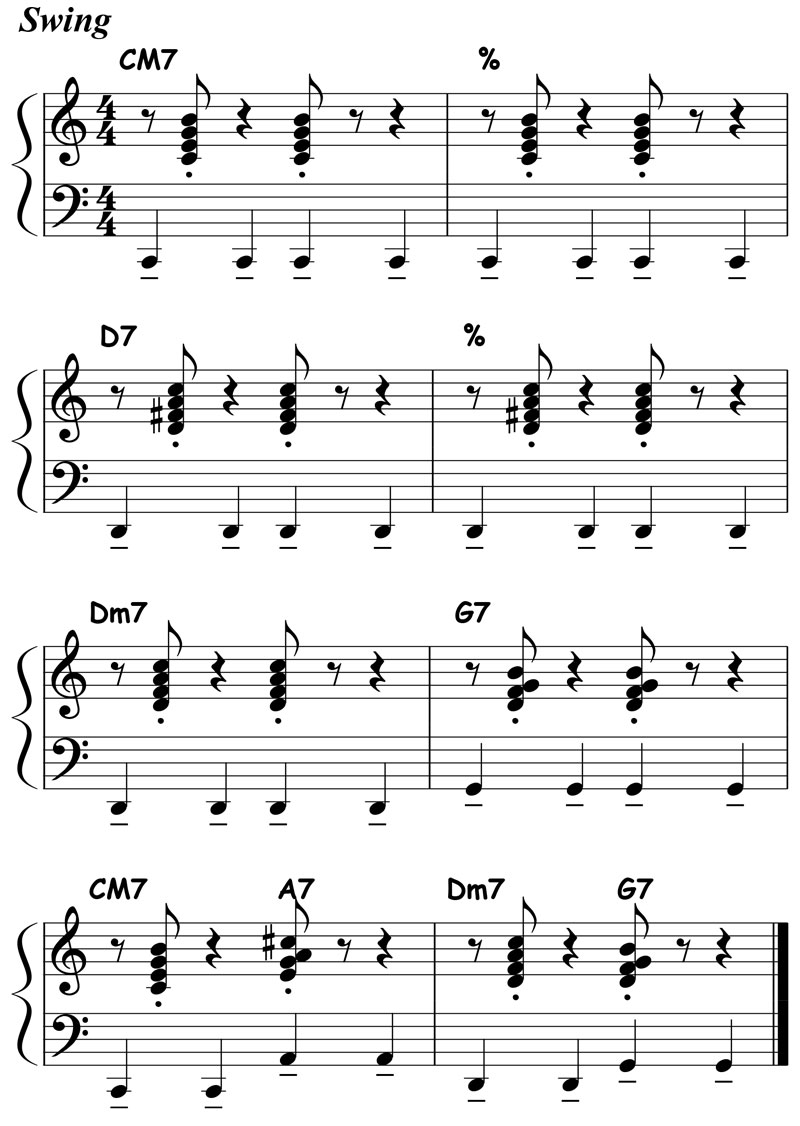
Comping Rhythm Patterns
A collection of learn by doing studies to help you internalize a variety of comping rhythms for “Take the A Train” by ear, intellect, eye, and muscle…
Effective jazz comping is not just about playing colorful chord voicings. It’s also about the groove. This requires a deep appreciation for swing 1/8th notes, syncopation, phrasing, dynamics, and articulations that are true to the essence of the style and complement the melody or soloist.
Practice Tips: At the risk of sounding like a broken record, I repeat the single most important piece of advice I give to every student (and to myself every day): Practice with a rhythm track, record yourself, listen to the playback immediately, and ask yourself: “Is THAT what you intended to play?”
Technique Tip: Each of these comping rhythm patterns requires a unique choreography that’s inseparable from the rhythm pattern, timing, note durations, rests, dynamics, articulations and your musical intentions!
Special Note: If you already know more elaborate chord voicings, feel free to use them.
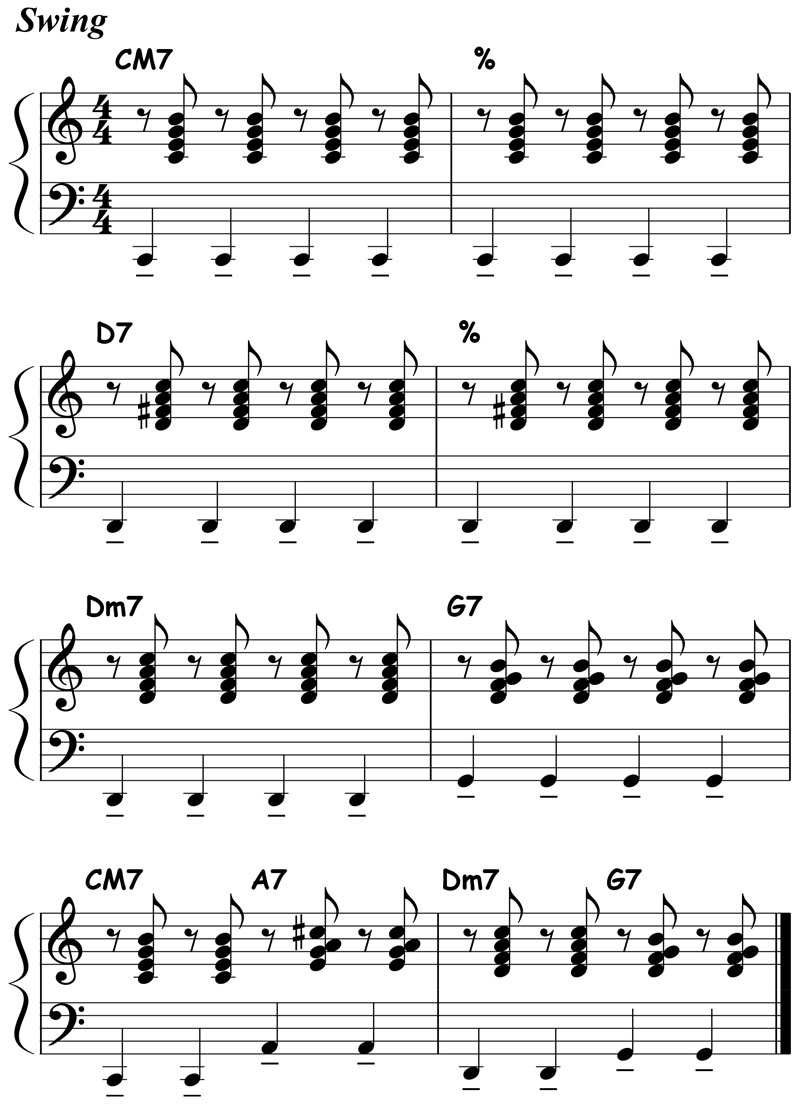
Comping Rhythm Pattern #1
The most basic pattern: Basic 7th chords on the strong beat of every chord change, an illustration of how things sound and feel when you play the downbeat of every bar without swing or syncopation…

Listen to Frank model one way to perform this at 140 beats per minute…
Practice Tip: Don’t get frustrated if you don’t “get” right away. Playing even the simplest patterns with good time is not easy. But it is a very learnable skill. So don’t give up, even if you need to try a hundred times. If you use effective practice habits you WILL get it, guaranteed, and this will reward you in all your music making!
Technique Tip: No flams! Play each left hand / right hand combination as if you have one big 10-finger hand!
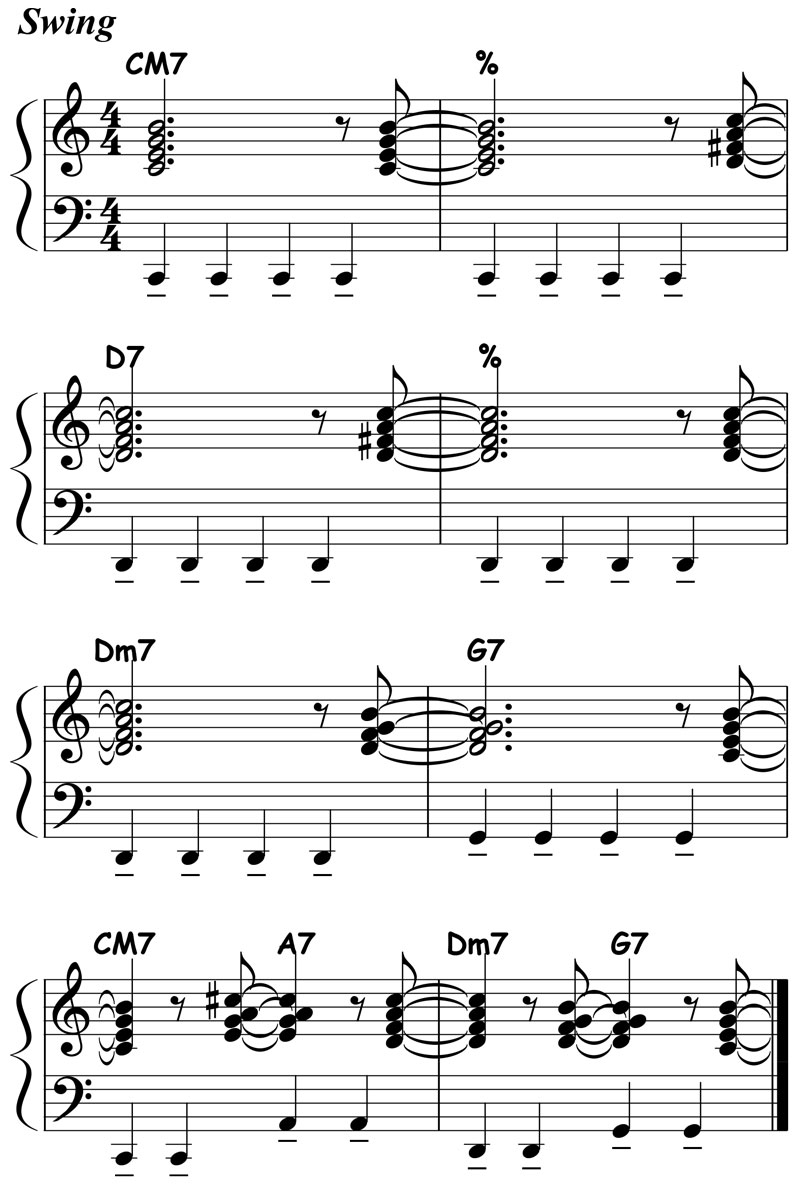
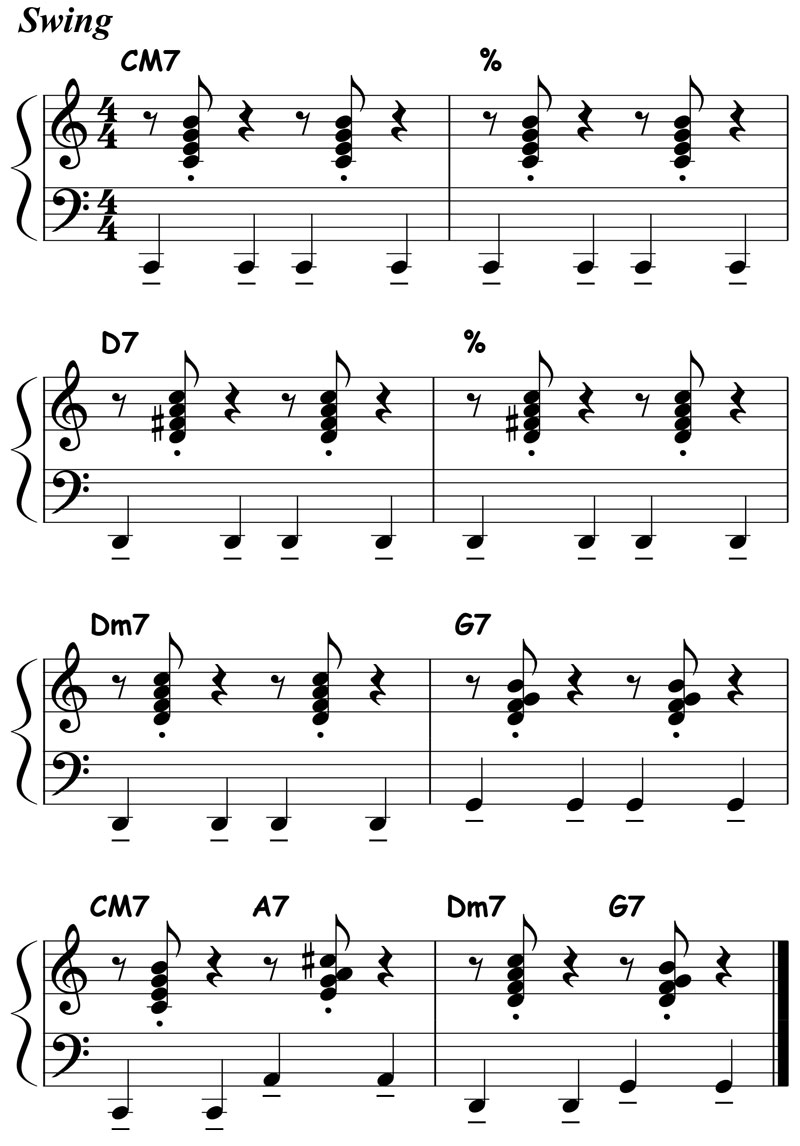
Comping Rhythm Pattern #2
Relentless straight quarter notes…

Listen to Frank model one way to perform this at 140 beats per minute…
Technique Tips: (1) No flams! (2) Most of the rhythm is carried in your arms. (3) Never do pushups on the key bed! (4) Repeated notes and chords are a particularly difficult challenge on the piano because you must lift off the keys you’ve just played in or to prepare to play the next. Experiment with different ways to use your arms and hands to accomplish this lift so that it feels natural and occurs “in rhythm”.
Comping Rhythm Pattern #3
Our first incorporation of swing 1/8th notes. How hard or gentle to swing is up to you. You can’t think your way to swing. It’s all about feel. Experiment with different timings, dynamics, and articulations in order to discover what feels right and natural to YOU…
Listen to Frank model one way to perform this at 140 beats per minute…
Practice Tip: This tempo may feel really fast at first. No hurries, no worries. Simply slow things down in order to work out your musical intentions and the associated choreography. If you work in this discipline way, you WILL get the hang of it and it will become second nature, guaranteed!
Technique Tip: (1) Don’t underestimate the difficulty of keeping a steady beat in your left hand. Think, feel, and play it with a cyclic arm and hand motion. (2) It shouldn’t feel like you’re attacking the right hand chords. The proper choreography is to already have your fingertips on the key surface before simply brushing the keys lightly downward as your arm drops and pulls toward you.
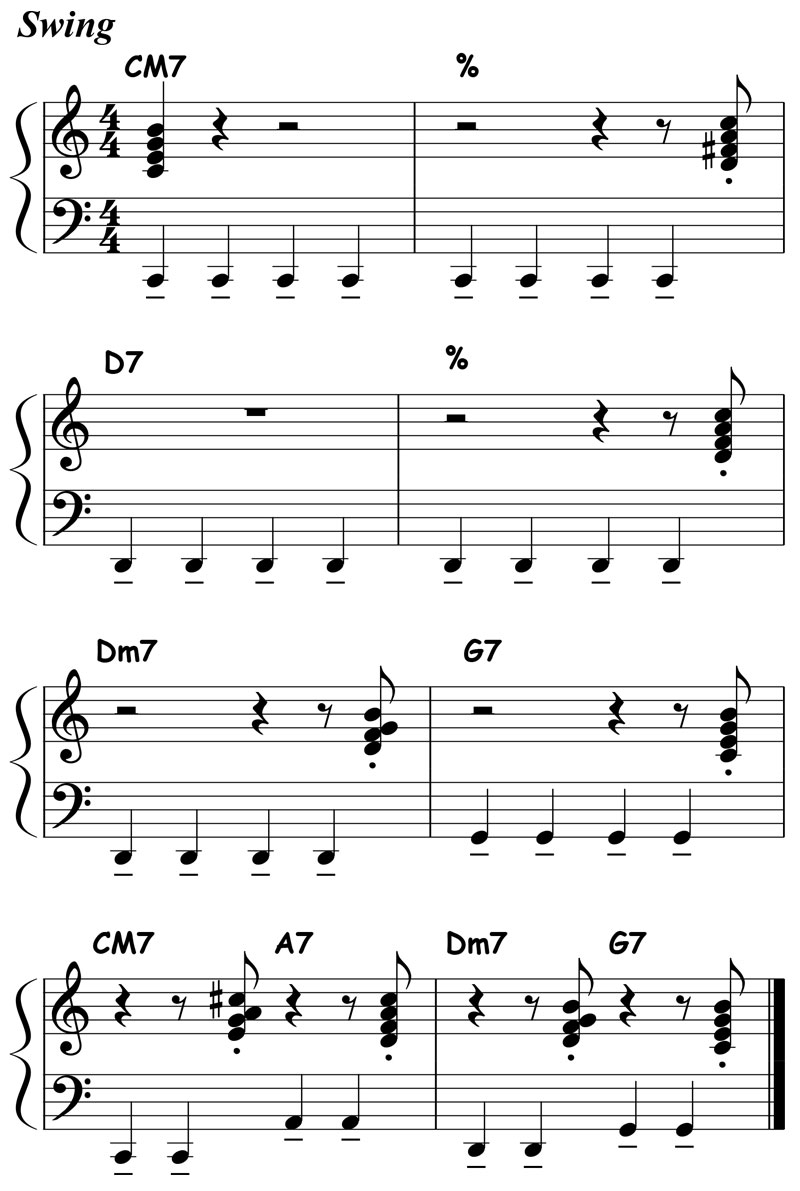
Comping Rhythm Pattern #4
A lesson in syncopation using delay: long sustained chords, but instead of starting on the strong downbeat, start on the upbeat just after…

Listen to Frank model one way to perform this at 140 beats per minute…
Technique Tip: To really tighten up your left/right coordination make sure that the timing of the rests and bass notes is perfectly synchronized.
Comping Rhythm Pattern #5
A lesson in syncopation using anticipation: long sustained chords, but instead of starting on the strong downbeat, start on the upbeat just before…
Listen to Frank model one way to perform this at 140 beats per minute…
Technique Tip: Don’t forget that rests are notes, too!
Comping Rhythm Pattern #6
A one bar syncopated rhythm pattern where the chords are played long then short in duration…

Listen to Frank model one way to perform this at 140 beats per minute…
Practice Tips: Each of these rhythms has a particular feel or “groove”. One of your tasks is to internalize each groove. You know you’ve arrived when you feel something “click” and you can play it without thinking.
Technique Tip: You always allow your mind’s ear to be the leader, right? So, scat the rhythm and feel and then play it like you’re scatting it!
Comping Rhythm Pattern #7
Another one bar syncopated rhythm pattern where all the chords are played in extremely short duration…
Listen to Frank model one way to perform this at 140 beats per minute…
Technique Tip: Don’t attack the right hand chords. The proper choreography is to already have your fingertips on the key surface before simply brushing the keys lightly downward as your arm drops and pulls toward you.
Comping Rhythm Pattern #8
A fully syncopated rhythm pattern where all the chords are played extremely short in duration…
Listen to Frank model one way to perform this at 140 beats per minute…
Comping Rhythm Pattern #9
Playing a single short syncopated chord per measure can be extremely effective…

Listen to Frank model one way to perform this at 140 beats per minute…
Technique Tip: One key to playing the staccato chords is just to get the keys moving without going all the way to the key bed!
Comping Rhythm Pattern #10
A two-bar syncopated rhythm pattern that combines two of the one-bar patterns above…

Listen to Frank model one way to perform this at 140 beats per minute…
Technique Tip: Don’t attack the keys. Simply give them the speed they need to suit the loudness you desire!
Comping Rhythm Pattern #11
Another two-bar syncopated rhythm pattern that combines two of the one-bar patterns above…

Listen to Frank model one way to perform this at 140 beats per minute…
Technique Tip: General speaking, you want to feel the key surface with you fingertips beforeke fingertip contact with the keys before you play them!
Comping Rhythm Pattern #12
This two-bar rhythm pattern illustrates that tasteful comping is often about “less is more”… how a single staccato syncopated chord can is just enough to get the job done while leaving all kinds of space for the soloist…

Listen to Frank model one way to perform this at 140 beats per minute…
Don’t underestimate the difficulty of playing this simple bass line with good rhythm.
Comping Rhythm Pattern #13
Another example of “less is more” comping…

Listen to Frank model one way to perform this at 140 beats per minute…
Don’t try to “memorize” these. Internalize the patterns and ideas.
Comping Rhythm Pattern #14
One way to create a strong sense of forward motion is play a staccato chord on the up beat just before each chord change as follows…
Listen to Frank model one way to perform this at 140 beats per minute…
Practice Tip. Don’t ignore the bass line. The bass line is where the the underlying “four-ness” of the music lives and breathes.
The HUGE Takeaway: Effective jazz swing comping is not just about playing fancy chord voicings. It’s also requires the deep appreciation of swing 1/8th notes and syncopation. Developing the proper feel cannot be achieved by just thinking about it. Developing the proper feel takes lots of experience and learning by doing… which may include hundreds of failed attempts.
To that end, you should always play with a rhythm track, record yourself, listen to the playback immediately, and ask yourself” “Is THAT what you intended to play?” If it isn’t what you intended to play, you must experiment with different timings, note durations, dynamics, and articulations (each requiring a different choreography) in order to discover what sounds and feels right and natural to YOU.
If you study and practice in this highly disciplined way, you will be rewarded with a rhythmic sensibility that automatically becomes part of your own personal comping style!
back to… Table of Contents
Basic 7th Chord Voicings
Learn by doing studies to help you internalize the basic 7th chord voicings in both hands for “Take the A Train” by ear, intellect, eye, and muscle…
Such knowledge and skill is essential preparation for comping and soloing in 32 bar song form…
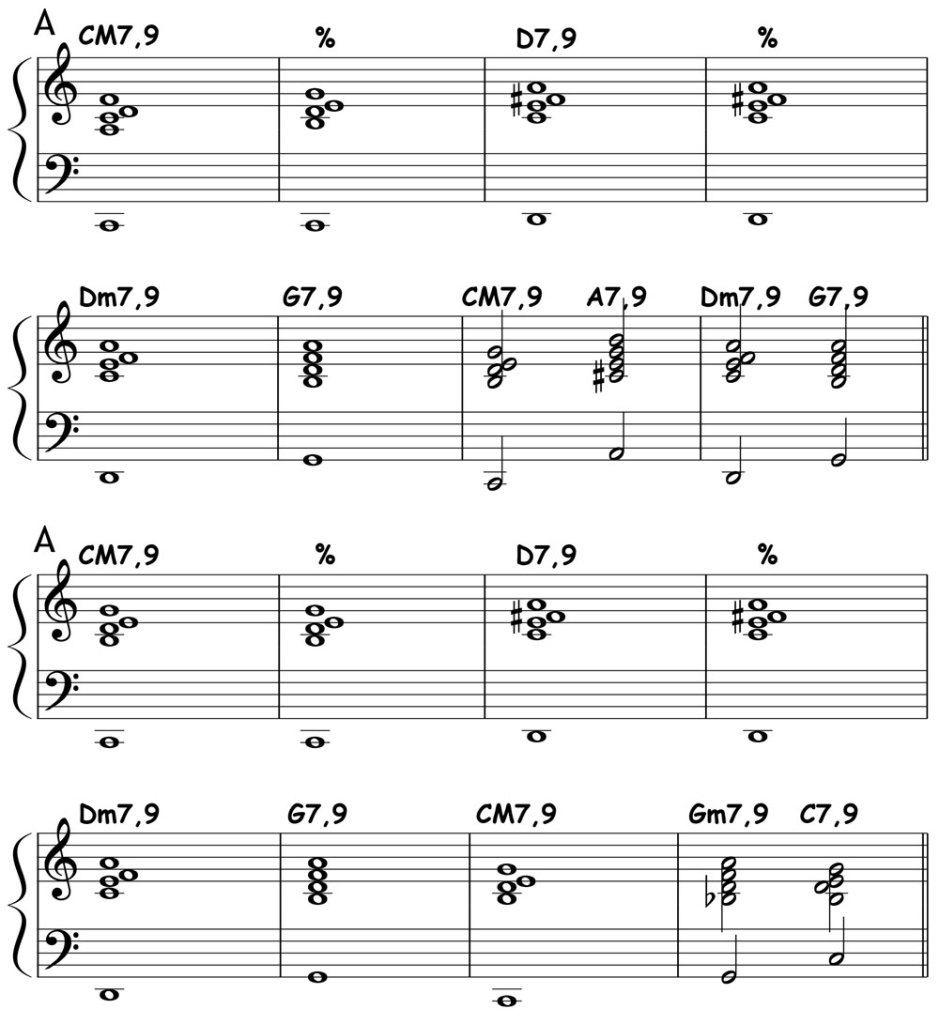
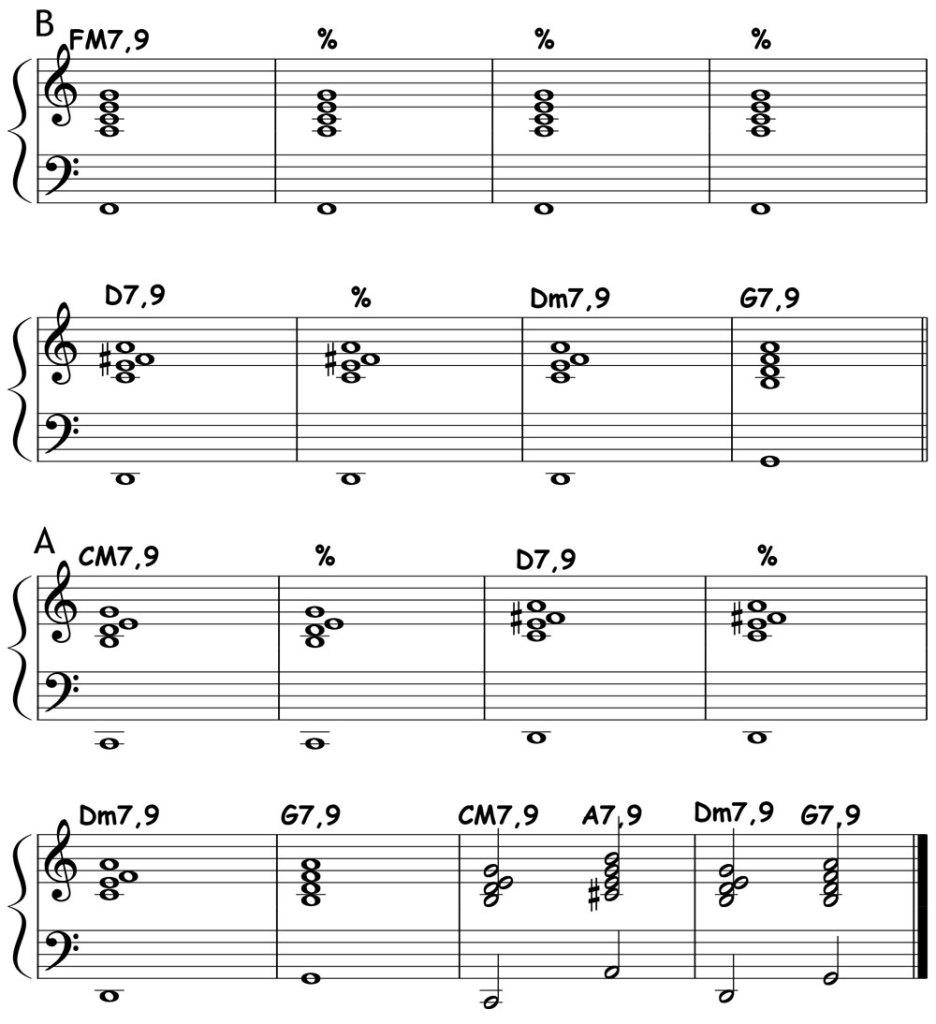
Chord Voicing #1: Left Hand Roots, Right Hand 7th Chords
The goal here is not just to “memorize” this, but to deeply internalize the pattern by ear, intellect, eye, and muscle…
- Left Hand = Chord Roots (The 1 of each chord)
- Right Hand = Starts with 1-3-5-7 of the I chord and continues using voice leading

Listen to Frank model one way to play this at 140 beats per minute…
Technique Tips: (1) Release each chord and form the next chord in your hand before playing it. (2) It’s ok to “cheat” using the sustain pedal!
Chord Voicing #2: Left Hand 7th Chords
All you have to do is take the chords from your right hand above and move them down an octave to your left hand…
Again, notice the pattern: Starts with 1-3-5-7 of the I chord and flows through the changes using voice leading…
Listen to Frank model one way to play this at 140 beats per minute…
Technique Tips: (1) Release each chord and form the next chord in your hand before playing it. (2) It’s ok to “cheat” using the sustain pedal.
back to… Table of Contents
“Add9” Chord Voicings
Learn by doing studies to help you internalize “add9” chord voicings in both hands for “Take the A Train” by ear, intellect, eye, and muscle…
The ability to play chord roots in your left hand and 9th chords in you right hand is essential preparation for accompanying a vocalist or soloist without a bass player.
And the ability to play rootless 9th chords in your left hand is essential preparation for playing with a bass player as part of the rhythm section, leaving space for your right hand to comp or solo. Rootless voicings can also be used when playing solo.
The logic for building, voicing, and Placing “add 9” chords
Step 1. Drop “the 1” and add “the 9” in the right hand. Dropping the root (the most expendable note because it’s already played in the bass) makes room to add the yummy color tone “9” while nicely fitting the natural size and shape of a human hand.
Step 2. Move the entire chord down one octave, which places it in the middle register where is sound rich (neither “thin” nor “muddy”) and stays out of the register typically occupied by the vocalist or soloist.
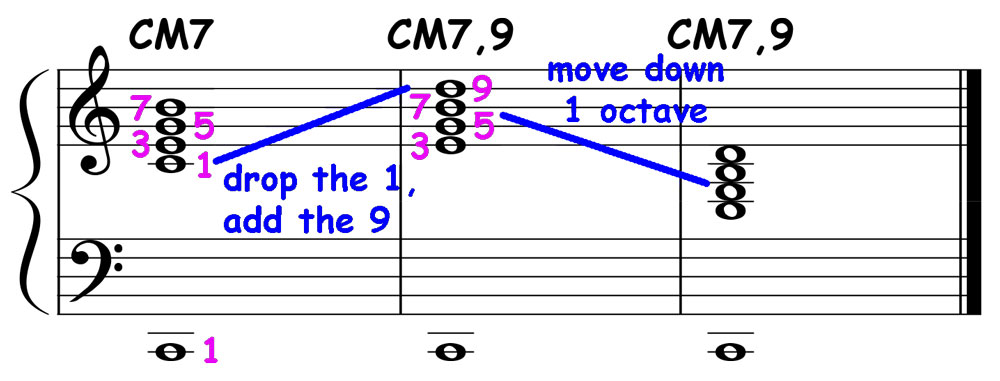
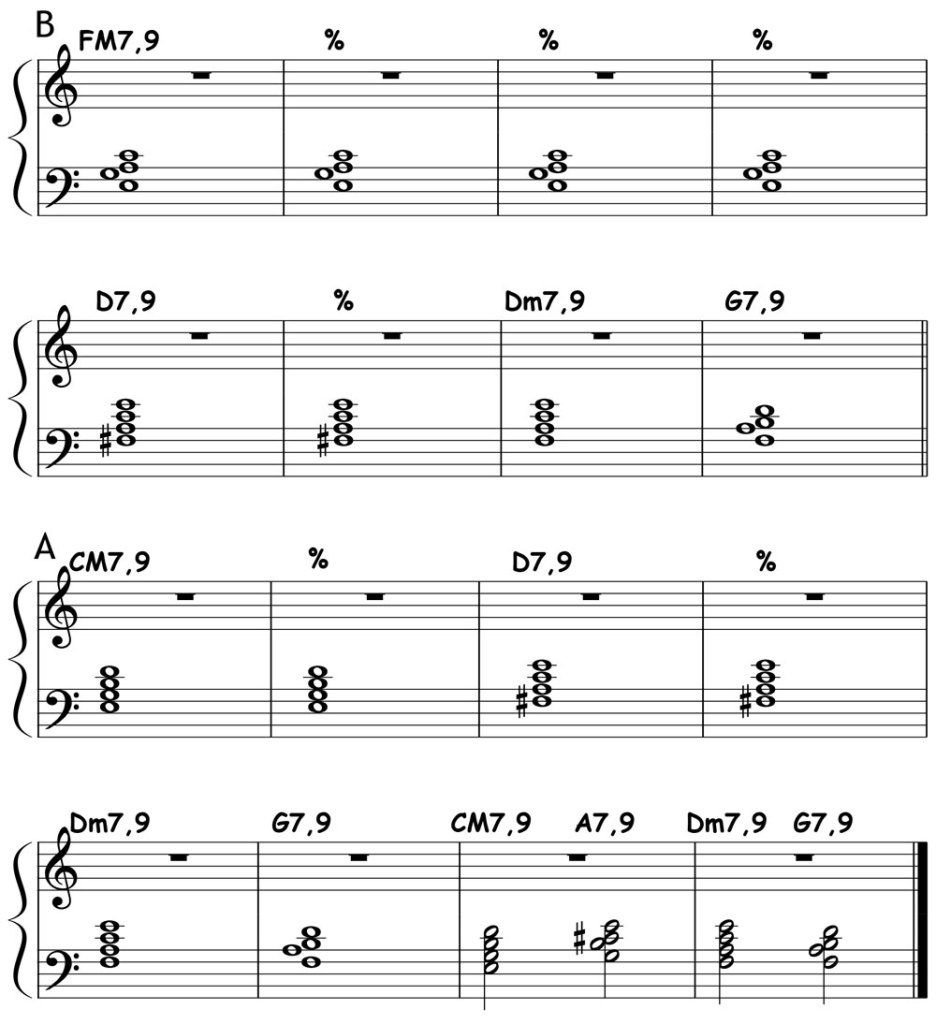
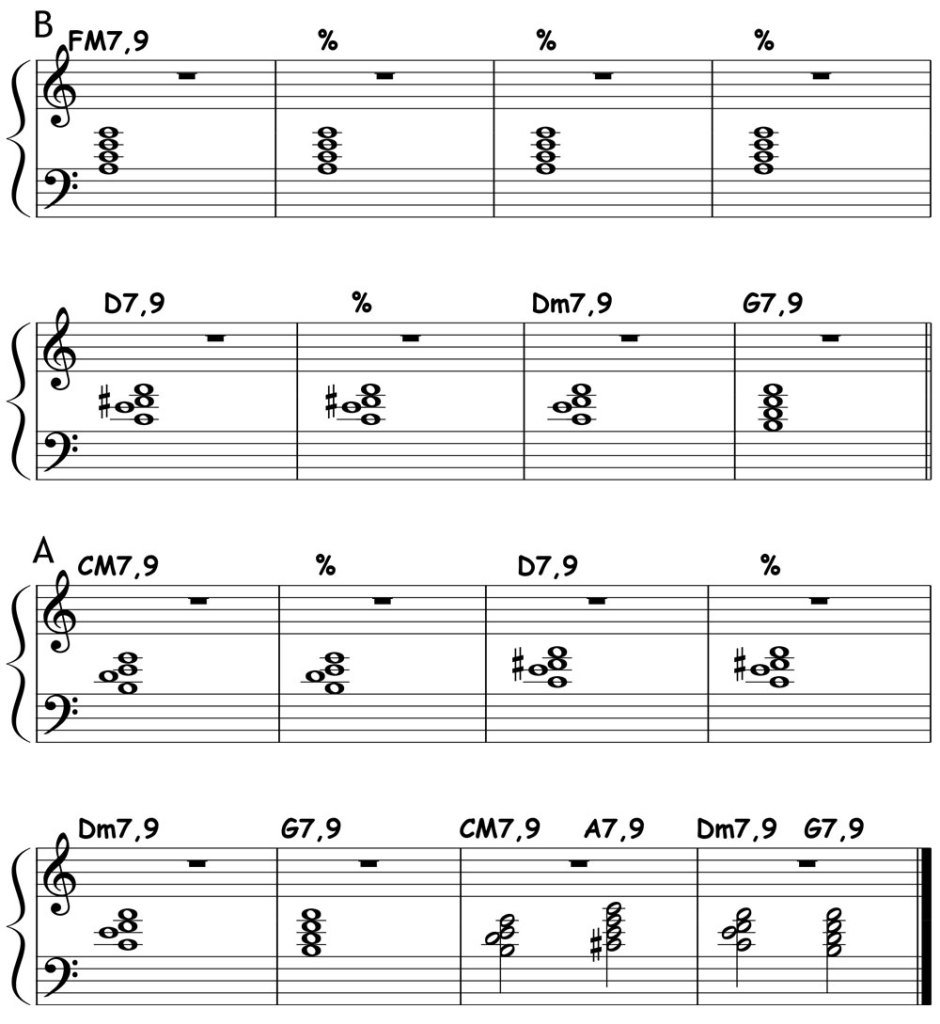
Chord Voicing #1: Left Hand Roots, Right Hand Add 9
- Left Hand = Chord Roots (the 1 of each chord)
- Right Hand = Start with 3-5-7-9 voicing on the I chord and continue using voice leading…
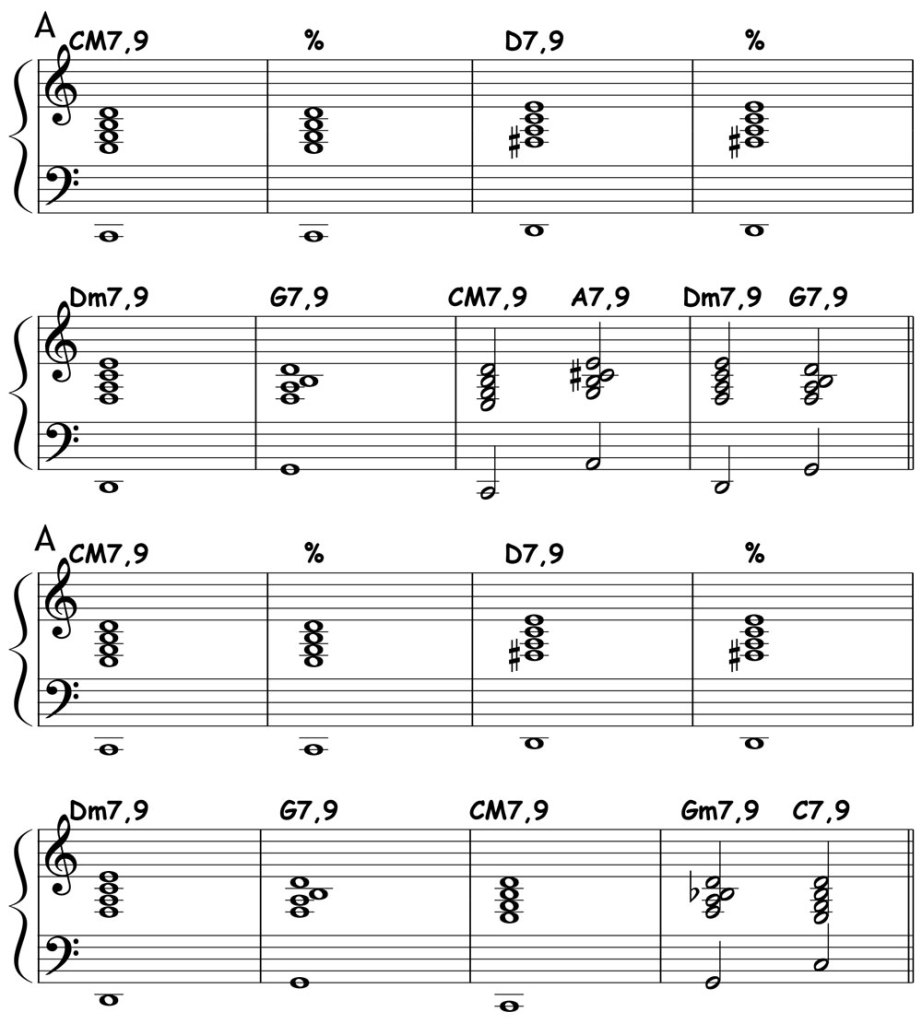
Listen to Frank model one way to play this at 150 beats per minute…
Technique Tips: (1) Release each chord and form the shape of the next chord in your hand before you need to play it. (2) It’s ok to “cheat” using the sustain pedal.
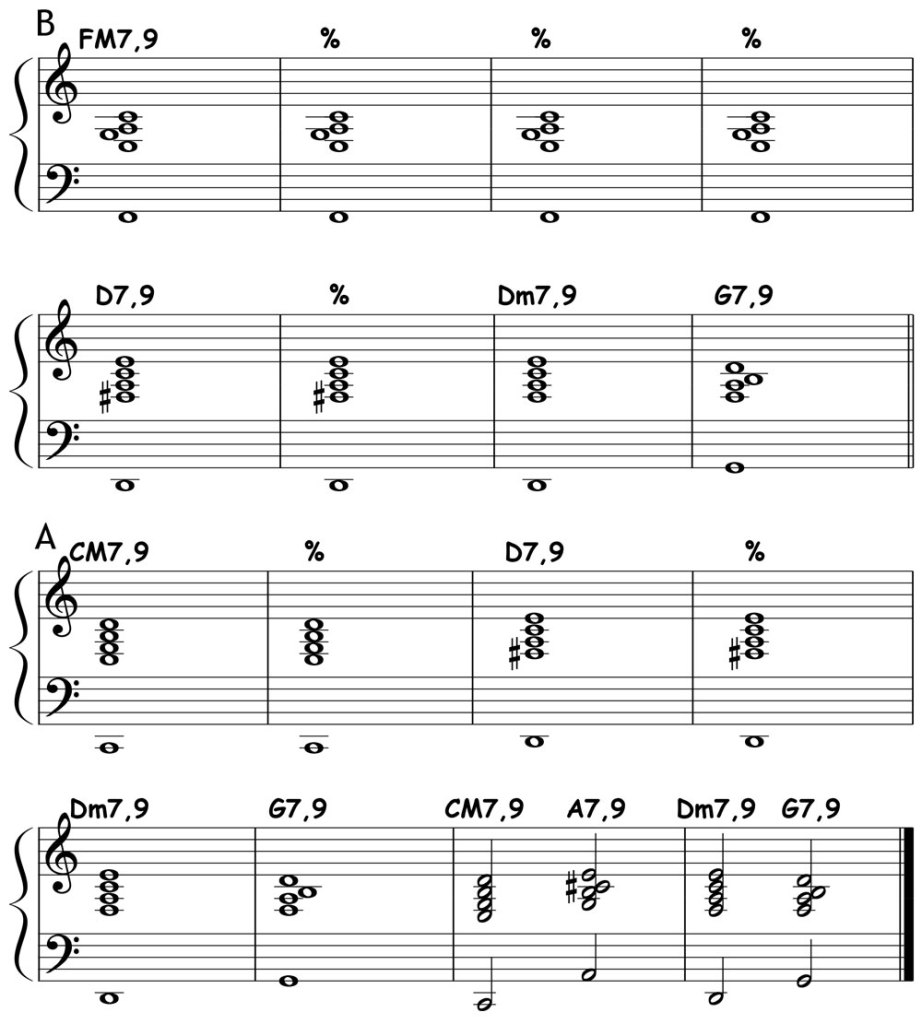
Chord Voicing #1: Left Hand Rootless Add9
Take the chords from your right hand above and move them down an octave to your left hand…
Listen to Frank model one way to play this at 150 beats per minute…
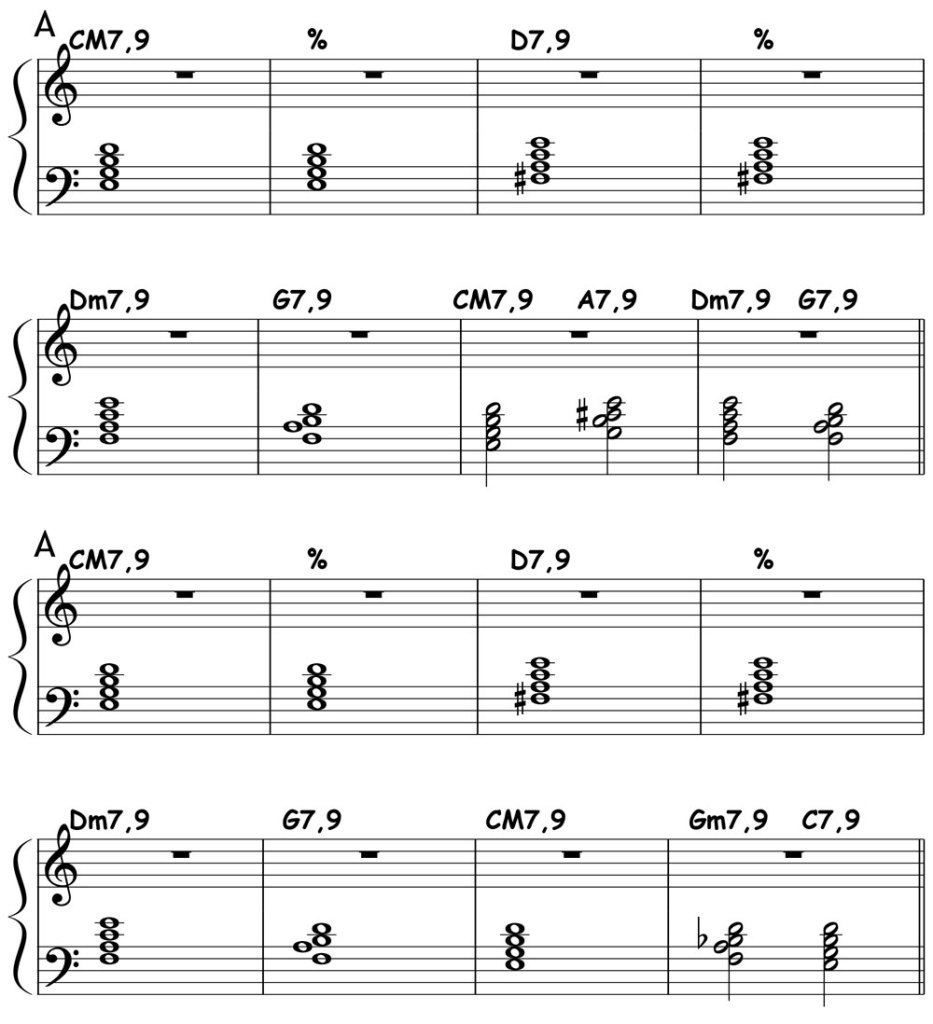
Chord Voicing #2: Left Hand Roots, Right Hand Add 9
The ability to revoice any chord is extremely valuable skill for comping and soloing. A common way to do so is to move the two bottom notes up or two top notes down…
- Left Hand = Chord Roots (the 1 of each chord)
- Right Hand = Start with 7-9-3-5 voicing on the I chord and continue using voice leading…
Listen to Frank model one way to play this at 150 beats per minute…
Chord Voicing #2: Left Hand Rootless Add9
Take the chords from your right hand above and move them down an octave to your left hand…

Listen to Frank model one way to play this at 150 beats per minute…
back to… Table of Contents
Walking Bass Lines
Walking bass lines are a great way to keep the time flowing and to outline the harmony in swing tunes such as “Take the A Train…
Here, for your consideration is a walking bass line “composed” by Frank for “Take the A Train”…


Reading Tip: These bass lines may seem complicated on the surface, but they are actually quite simple. It’s all about emphasizing chord roots and primary chord tones on the strong beats (1&3) and smoothly connecting the chord tones to each other using passing tones and leading tones on the weak beats (2&4). This is where knowing your scales and chords really pays dividends.
Rendered as a stand-up bass with drums at 150 beats per minute…
Your Homework
Print the score, download the MP3, read, and play along, mimicking the big round thumping sound of a stand-up bass player.
Every time you do so… record yourself, listen to the playback immediately, and ask yourself: Is THAT what you intended to play? If not, use what you learned in “Practice Habits” keep on experimenting until you get there.
Working in this disciplined way with reward you in at least six ways: (1) Builds intuition about constructing melodic bass lines, (2) Teaches you how to outline the harmony with just a few notes, (3) Gives you some bread and butter walking Bass vocabulary to add to your bag, (4) Develops a feel for the flow of 4/4 time in a swing context, (5), Transfers your sense of rhythm from merely counting in your head to feeling it in your whole body, (6) Teaches you to how to answer basic fingering questions, (7) Develops your left hand technique.
Special Note Regarding the Fingering. Frank has no interest in just handing you a fish. If, after an honest effort, you are still struggling with fingering, email Frank with your particular question and he will reply as appropriate.
back to… Table of Contents
Any Interest in More Lessons on “Take the A Train”?
Pleas comment below.
Discover more from PIANO-OLOGY
Subscribe to get the latest posts sent to your email.